
What it's for
Central Control is the app at the desk. The main admin and the admins use it to run the lights, slides and lyrics, cameras, the mix, the in-ear mixes, talkback and the recording, and all of it follows the song that's playing.
The main admin's copy is the hub. Every other computer, phone, tablet and Central Pedal pairs with it, and it keeps track of the team: who has which role, what each admin computer does, the service lock and the run sheets. If you don't have a Central Pedal, the hub plays the tracks, charts and lyrics itself in its player window.
A church can have up to two main admins. They can do everything, and they also hold the pairing PIN and the role PIN and run the Devices tab, where each device gets its role and jobs.
Admins only see the tabs for the jobs their computer does. There are seven jobs: Lyrics, Lights, Cameras, In-ears, Tracks, Live stream audio mix and Slides. One computer can do all seven, seven computers can do one each, or anything in between. If your church doesn't use cameras, leave that job out. One A key covers one computer whatever jobs it does, and you can have as many admins as you like.
Musicians and singers use Central Usage instead. It has their chart, lyrics, instrument and in-ear mix, and it can't be made an admin.
Your key and your computer
Central Control needs an A key, which is an admin key. Each one works on one computer at a time and includes ten releases of updates from the version you buy it at, so a key bought at 10.4 gets every update up to 11.4. Renewing for $20 adds ten more. If you don't renew, Central Control keeps working. You just stop getting new versions.
It runs on Windows 10 and 11 (64-bit), on Macs with Apple Silicon or Intel, and on Linux (Ubuntu, Debian and the like, or any Linux with the AppImage). Install the apps has the steps.
To move a key to another computer, press Release key under Settings → Packages & key, or release it on the website under your account icon → My products.
First-time setup
Set up the main admin's computer first. It's usually the sound desk computer, and it needs to be open during the service. Allow about fifteen minutes for the hub and five for each computer after it.
The main admin's computer (the hub)
- Install Central Control and open it. The first time, it asks for your church's name and your A key, then your Motion Audio account. Sign in with the church's account or your own.
- Choose Main admin and give the computer a name people will recognise, like Sound desk.
- Pick what this computer will do. Choose any of Lyrics, Lights, Cameras, In-ears, Tracks, Live stream audio mix and Slides, or all of them. You can change this later under Settings → This computer & devices.
- If this computer is the sound desk and has the audio interface, pick its inputs and outputs.
- Choose two different 4-digit PINs. The pairing PIN is the one you share, because every device types it to join. The role PIN is only for you. It's what moves a computer between the user side and the admin side.
- To play tracks, go to the Devices tab and press ▶ Open the player on this computer, or pair a Central Pedal. The player window is the Central Pedal app built into Central Control, so there's nothing else to install.
Each admin computer after that
- Install Central Control and sign in with your account and your A key.
- Choose Admin, give the computer a name (Lights, Cameras and so on) and pick its jobs.
- Type the pairing PIN. It finds the main admin's computer on the network by itself. If it doesn't, type the hub's address, which is under Settings → This computer & devices on the main admin's computer.
- Wait for the main admin to let you in. Without the role PIN, the computer starts as User 1 and the main admin gets asked to make it an admin. They allow it on the Devices tab.
If two computers pick the same job, both get asked which one runs it, and if that one goes offline the other takes over by itself. Settings → This computer & devices shows who runs each job, with a Run it here button.
Phones and tablets can open the user side straight from the hub. Go to http://<hub address>:8095/cu/ in Safari or Chrome. Musicians get the full app with Central Usage.
The tabs
On the main admin's computer the tabs are Service, Lighting, Lyrics, Slides, Video, Online mix, In-ears, Shorts, Devices, I/O, Controls and Settings (the cog). An admin computer only sees the tabs for its jobs, plus I/O, Controls and Settings. F1 to F9 switch tabs.
On the Controls tab you can give any job in Central Control to a MIDI controller, footswitch, Stream Deck or computer key. Press Add new control, pick Button, Knob or Slider and name it. Then press it once, or turn or slide it from one end to the other, and give it a job. Settings → Look changes the colours of everything, and there's a button to go back to ours.
The top bar always shows your countdown, to the service and to your own next part (Lights: Sermon in 4:10, then you're on), and it warns you a minute before. Tap it to see the run sheet with your parts marked.
Devices
This is where the main admin looks after the team.
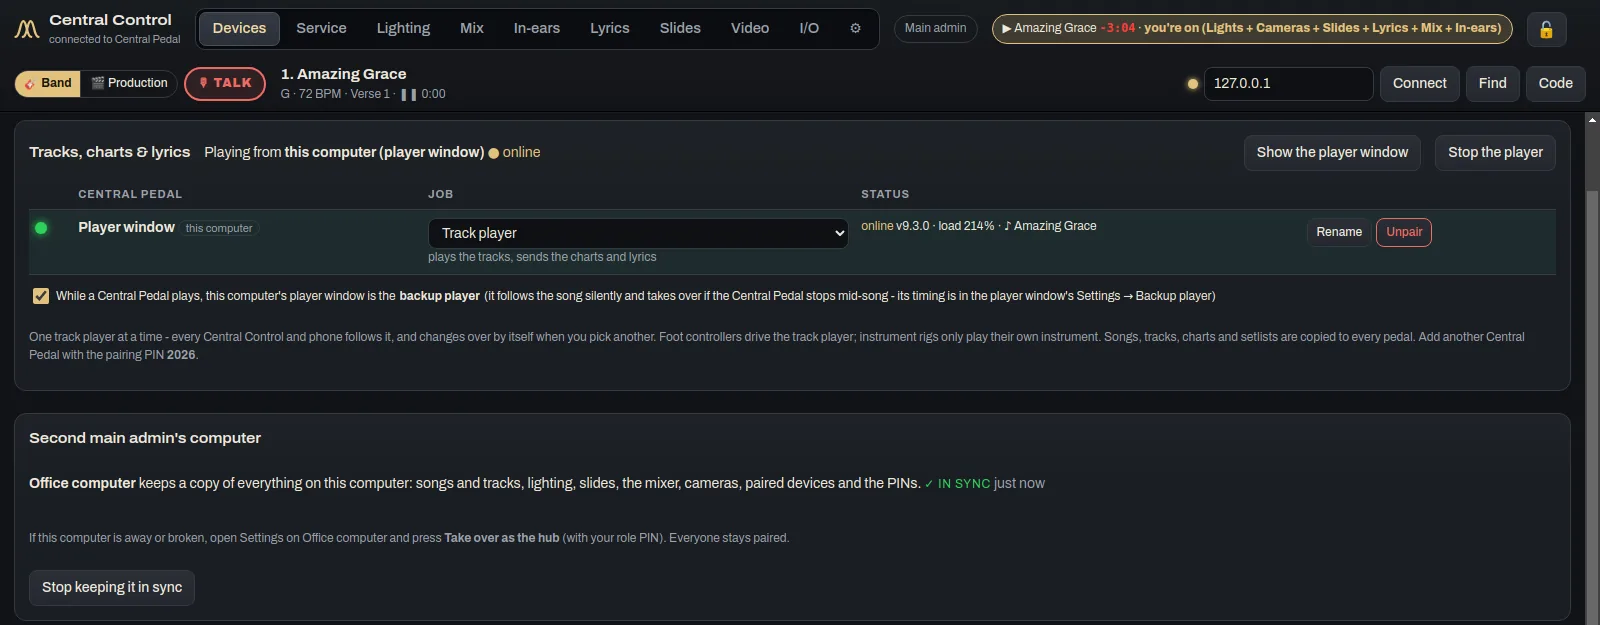
Each device is listed with its role and jobs and how its connection is doing. That covers the delay to the hub, the in-ear buffer and dropouts, the processor, the battery and the version, and it's marked good, fair or poor. Next to each one are Change role, Lock or Unlock, Rename and Remove. Remove sends the device back to its first-time setup. You also set each admin computer's jobs here.
The Talk group column decides who hears the main admin's talkback. Users start in Band and admins in Production.
Central Pedals
You can pair as many Central Pedals as you like, and give each one a job.
- Track player plays the tracks and sends out the charts and lyrics. Only one pedal does this at a time, and everyone follows it.
- Foot controller drives the track player from its footswitches and knobs.
- Instrument rig only plays its own instrument.
- Backup player follows the track player without making a sound and takes over if it stops.
By default the tracks play on this computer's player window and any pedals act as foot controllers, which leaves the Pi less to do. If you close the player window, a pedal takes over, and when you open it again it takes the tracks back as soon as nothing is playing. If you'd rather the pedal played the tracks, choose a Central Pedal under where the tracks run.
Service lock
Service lock locks every device at once, or you can lock them one at a time. It closes the I/O tab, settings, fixtures, lighting outputs and video sources. Everything people use during the service keeps working.
The second main admin's computer is set up from this tab too, with Keep … in sync. The second main admin's computer explains it.
Service
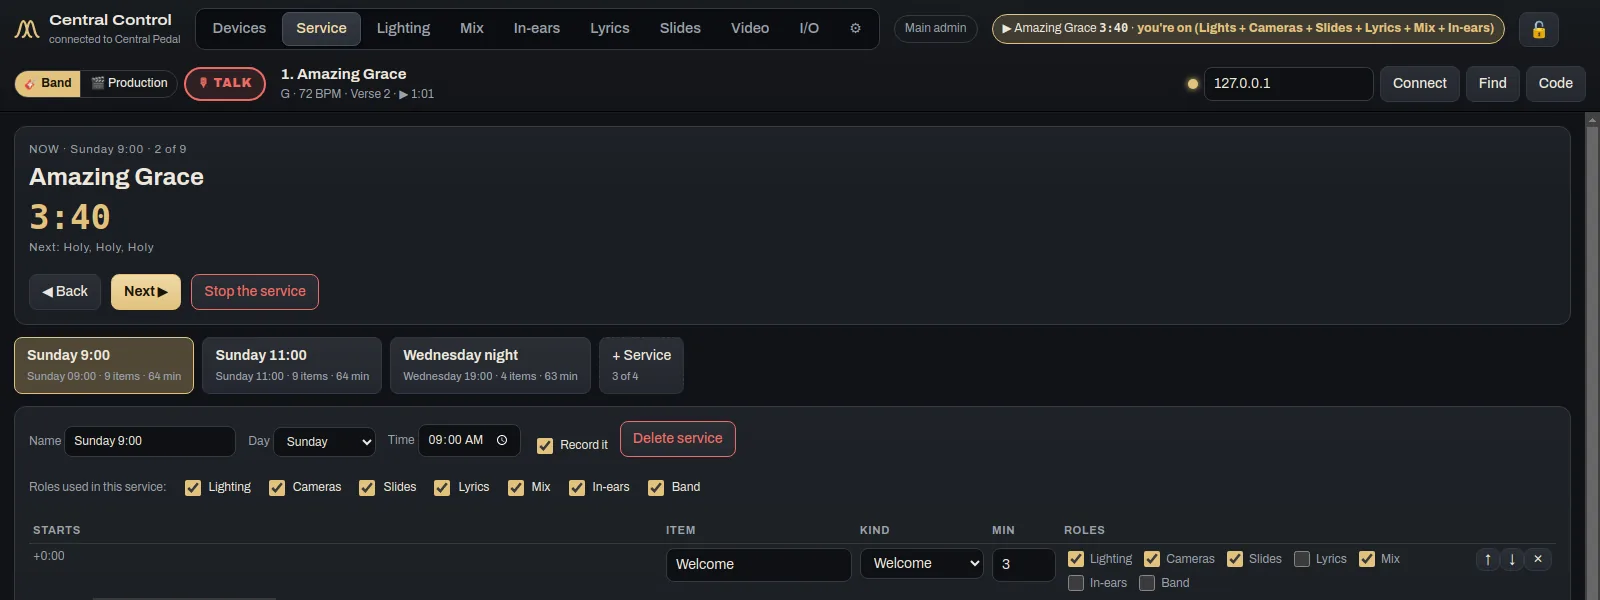
The Service tab is on the main admin's computer and has two parts, Run sheets and the Pre-service check.
Run sheets
You can keep up to 12 run sheets, for example Sunday 9:00, Sunday 11:00, Wednesday night, or a special service on one date. Each has its day and time, how long it should run, the countdown before it, who's on, and its items: songs from the setlist, the welcome, prayer, the sermon and anything else. Each item has its minutes, who leads it, a note, the roles involved and the cues it sends to each computer, like a lights look, a slide, a camera or a lower third.
New run sheet asks you a few questions and makes one for you. Drag items to change the order. You can Save as template or Print it.
Start, Next, Back and Stop move the whole team through it. Each computer fires its own cues and counts down to its next part, and the stage display shows the service countdown too. The run panel tells you whether you're running long or short. Tick Record it and the audio host records every input and a stereo mix while the service runs.
Pre-service check
Open the Pre-service check before the service. It looks at each device, key, output, input, light, camera and screen, the stream, disk space, Wi-Fi, batteries, the songs and the clocks. Each line comes up green, amber or red, and the red ones say what to do. Fix what it finds and press Check again.
Chord chart and Instrument
The chord chart and the instrument belong to the musicians, so they're in Central Usage. Central Control sends them the song and the section that's playing, so each musician's chart and lyrics keep up.
Lighting
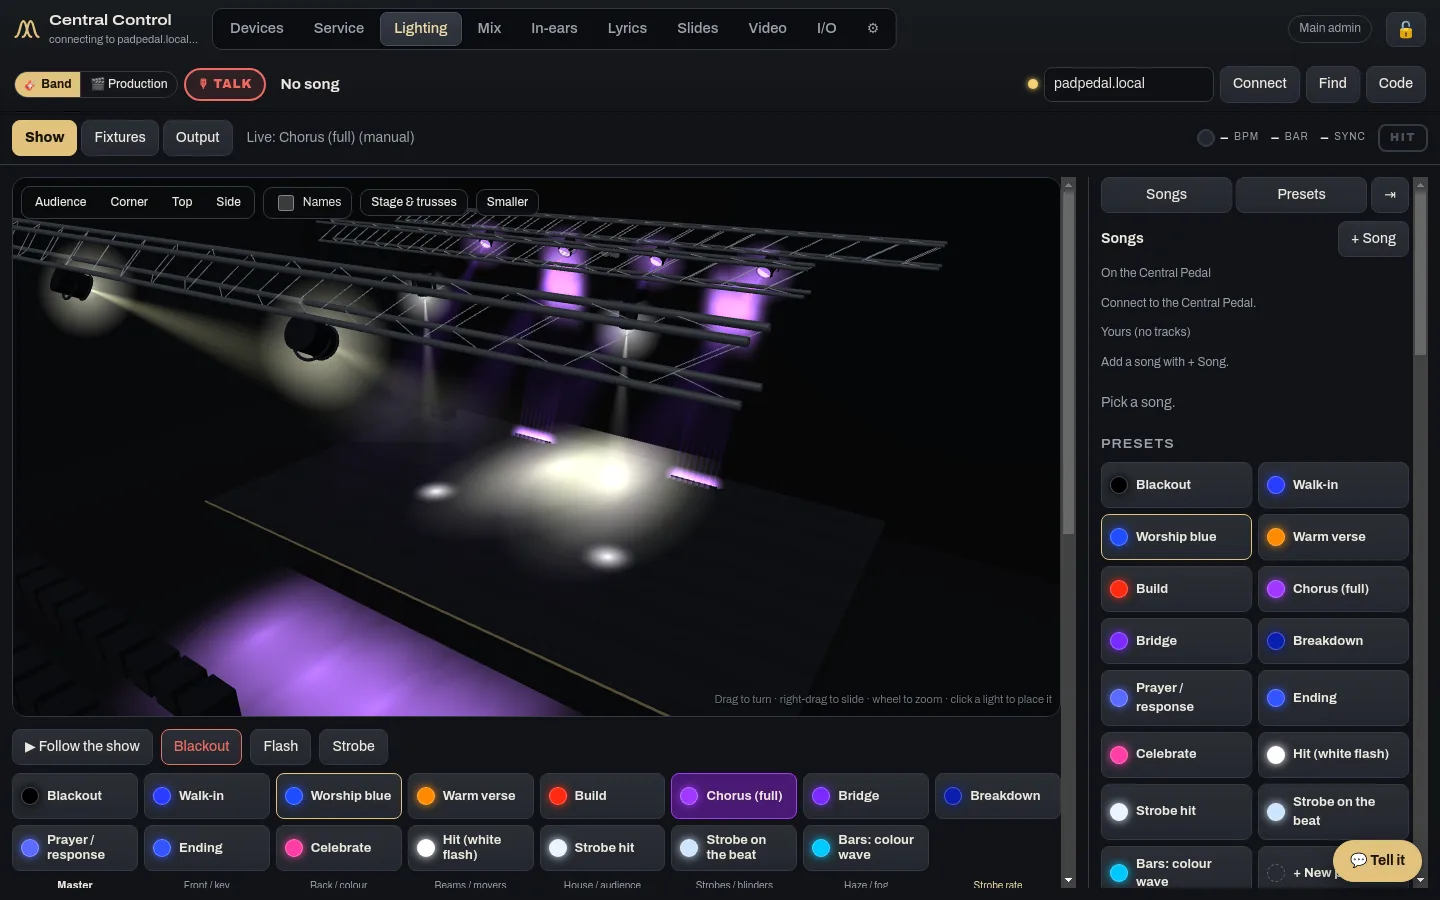
The Lighting tab is a light controller that follows the song, with your stage in 3D. It has three parts: Show, Fixtures and Output.
Setting up your stage
If you're starting from nothing, press Build my stage. It asks a few questions about your room and builds the stage, or you can start from a template or bring in your patch.
The 3D stage is drawn at its real size with its trusses and the audience. Each light shows its colour, its beam through the haze and where it lands. Moving heads turn as they would, bars show each cell, and strobes flash.
Drag to turn the view, right-drag (or Shift-drag) to slide it and use the wheel to zoom. You can also pick Audience, Corner, Top or Side. Bigger gives the stage the whole width and Names shows each light's name.
To place a light, click it and drag it along its truss or across the floor. In its panel you choose where it hangs (on the floor, a truss or over the audience), how high it is and where it points. Drag Points and Tilt down, or press At the stage, At the audience, Straight down, Straight up or Back wall.
Under Stage & trusses, type your stage's width, depth and height and the room in front of it, then add trusses with how far they are from the front edge, how high and how wide. A negative distance puts a truss out over the audience. Lights on a truss move with it.
Show
The timeline shows the song's waveform, its sections in their colours, the hits as yellow lines and your cues. Click the timeline to add a cue and drag a cue to move it. It snaps to the bar, the beat, or half or quarter beats.
Each song has a mode. In Auto the sections and hits run the lights. Semi-auto does the same with your own cues on top, and Manual only plays your cues.
Auto decides whether a song is intimate, mid or upbeat, finds the beat and the start of each bar (even from a live band with no tracks), and builds through the song. Each chorus gets a little bigger, the chorus after the bridge comes down, and the last full chorus is the peak. Faces stay lit while someone's singing. It works with whatever lights you have.
Strobes are kept safe unless you turn that off in the Strobe panel. They never go faster than 3 flashes a second, and they rest after 2 seconds of strobing.
You can describe the show in plain words with Tell it the show. Type something like "dimmers blue 20% for the verse, then chorus full white, strobes on the hits" and it makes the presets and cues.
To record, press ● Record while the song plays, on the pedal or with ▶ Preview here, and everything you press goes onto the timeline. Record over any part again to replace just that part.
The Lights list shows every light under the plot. Change a light's colour and level live, then press + Cue with these colours to keep it. The Songs list has every song, with or without tracks. A scene you program at 93 BPM stays on its bar and beat when the band plays the song at 112.
Light bars have a colour for each cell. Chase, Rainbow, Wipe, Bounce and Sparkle run cell by cell along all the bars in a group, and Alternate swaps every other cell. Pick the bar type in Fixtures, or import its file and the cells are found for you.
Hold Strobe (or the S key, or Strobe on the phone remote) and the strobes flash at the rate on the Strobe rate fader, or in time with the beat if you set that under Output → Strobes. Turn on Strobe burst on the hits to fire them on each hit.
Fixtures
Fixtures is the patch. Each light has its type, universe, address and group. Press Find a real light… to search the library by maker and model. If yours isn't there, Make a profile… lets you list its channels and say what each one does. New lights go on their group's truss to start with, and you can move them on the 3D stage.
Output
Each universe gets its own DMX output: USB-DMX (ENTTEC Pro and compatibles), Art-Net or sACN, with a monitor for each. If you'd rather run the lights from Lightkey, QLC+ or a lighting console, send MIDI out to it instead. Output also has the click (to hear while you program, for the lights to follow, or to send to an audio output), timecode (MTC or LTC) and the phone remote.
Online mix
The mixer runs on one admin computer, which is the audio host. To make a computer the audio host, open the I/O tab and choose This computer is the audio host. It gets each track from the Central Pedal on its own channel, along with the click, the pads, the tracks mix and the instrument.
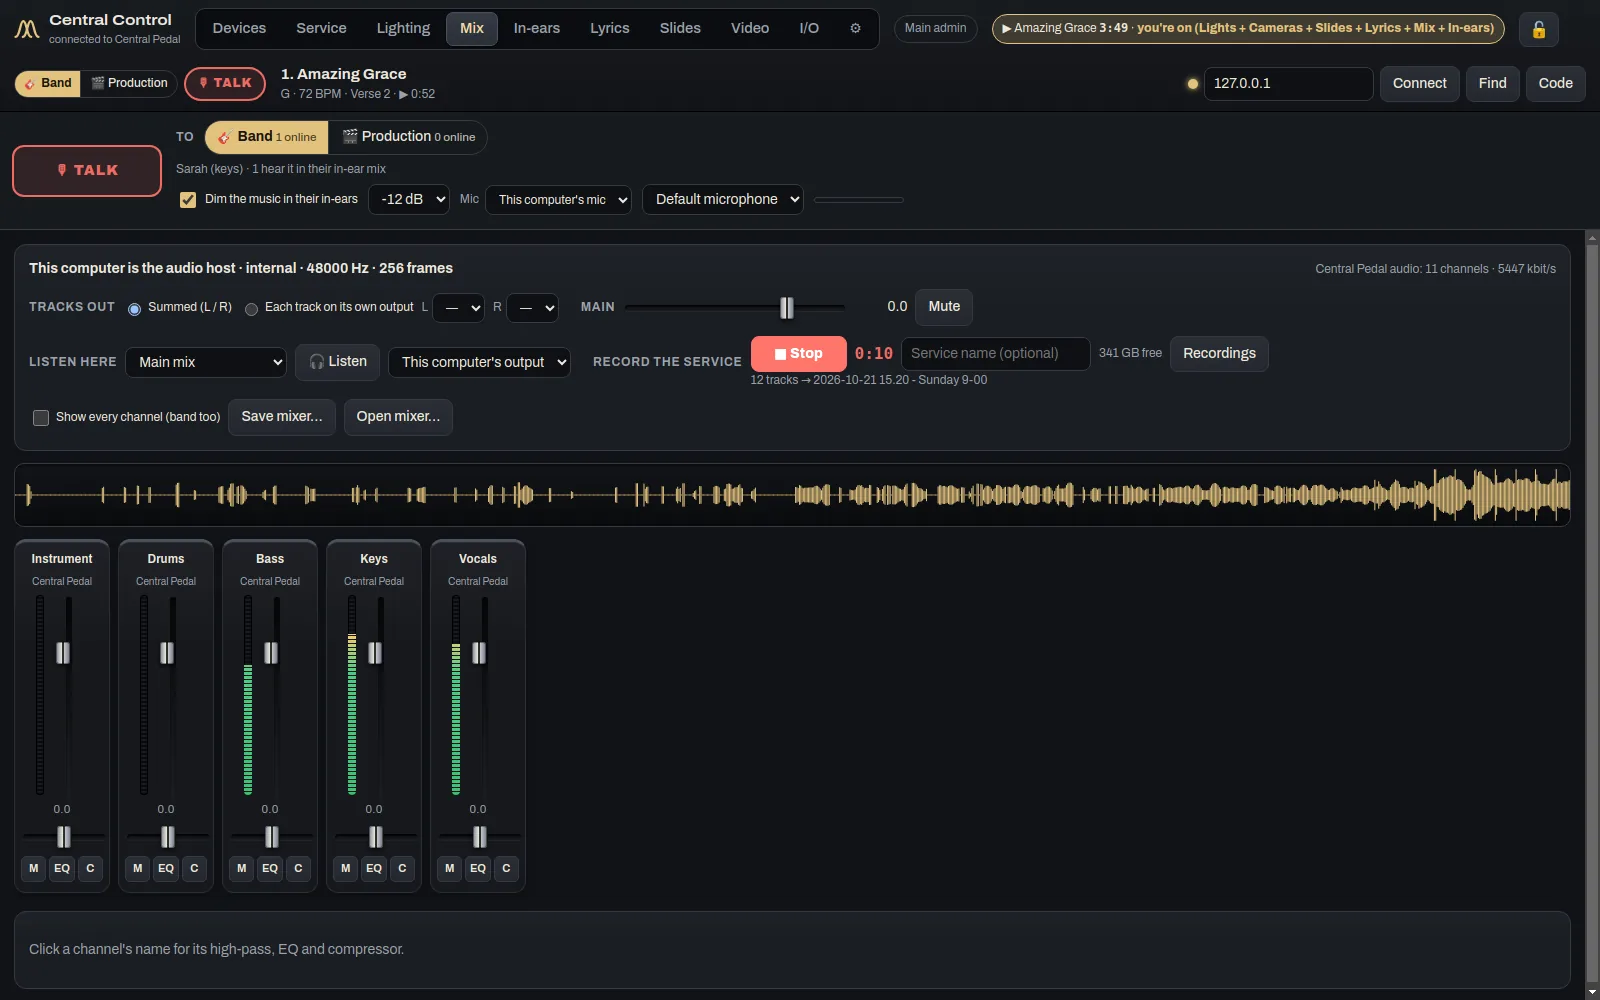
Each track has a strip with a fader, meter, pan and mute, then a high-pass filter, a gate, a 4-band EQ and a compressor, plus sends to a shared reverb and a shared delay that follows the song's tempo. There are presets for lead vocal, speech, acoustic, kick, snare and more. Click a strip's name to see the details. Channels are matched by name, so "Drums" keeps its settings from one song to the next.
Stream mix is a separate mix for the live stream, with its own level and pan for each channel, its own compressor and a limiter. Send it to an output pair, to a virtual sound device for OBS or Zoom, straight to YouTube or Facebook, or into the Video tab's stream.
Under Settings you choose whether the tracks leave the interface mixed down to two outputs or each on its own output. Listen here plays the main mix or any in-ear mix on this computer's headphones.
Record the service records every input of the interface or Dante (up to 128), the pedal's tracks and a stereo program mix. You get one WAV for each source at 48 kHz / 24-bit, in a folder named with the date, time and service. The program mix also becomes an MP3 for the sermon podcast. The button shows how long it's been recording and how much disk space is left.
Save mixer… and Open mixer… keep the whole setup in a file. Other admins with the Tracks or Live stream audio mix job can work on the same mixer from their own computers.
Shorts
Shorts is on the main admin's computer. After a service is recorded, it picks out the good parts and makes them into vertical videos with captions. For each one you can play it, trim it, fix the captions, write a title and description, then approve it, download it or post it to YouTube, Facebook, Instagram or TikTok. You can also make another short from any moment in the recording.
In-ears
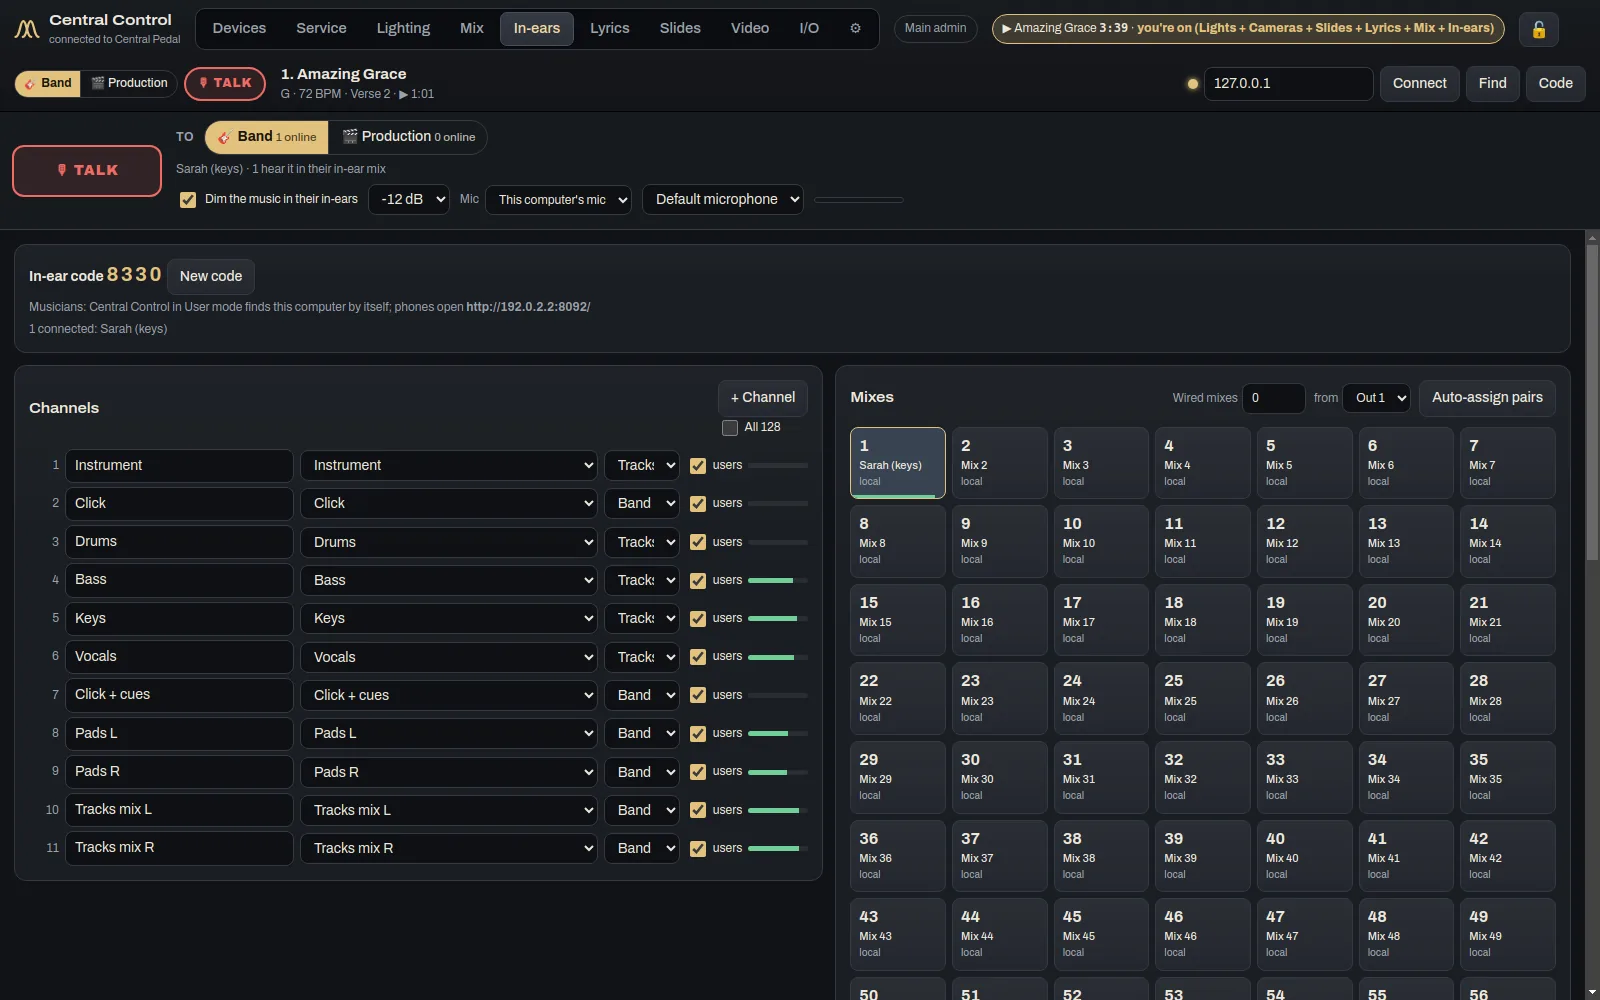
You can have up to 128 channels. Each is a Central Pedal channel or an interface input, with a name, whether it's Tracks or Band, and whether users can see it.
You can have up to 64 stereo mixes, each with a name, an owner and where it goes. A wired mix goes out of the interface or Dante on the output pair you pick, to your in-ear transmitters, with no delay. Auto-assign pairs numbers them in order. A local mix goes back over Wi-Fi to its owner's device. A mix can go both ways at once.
Underneath are the send levels for the mix you've selected. You can listen to any mix, copy one or free it up.
Talkback
Hold TALK to talk, or tap it once to leave it on. The main admin picks 🎸 Band or 🎬 Production, or ticks the mixes that should hear, and can turn the music down in people's ears while talking. The person talking sees a red ON AIR. Everyone else's talkback only goes to the main admin's headphones.
Lyrics and slides
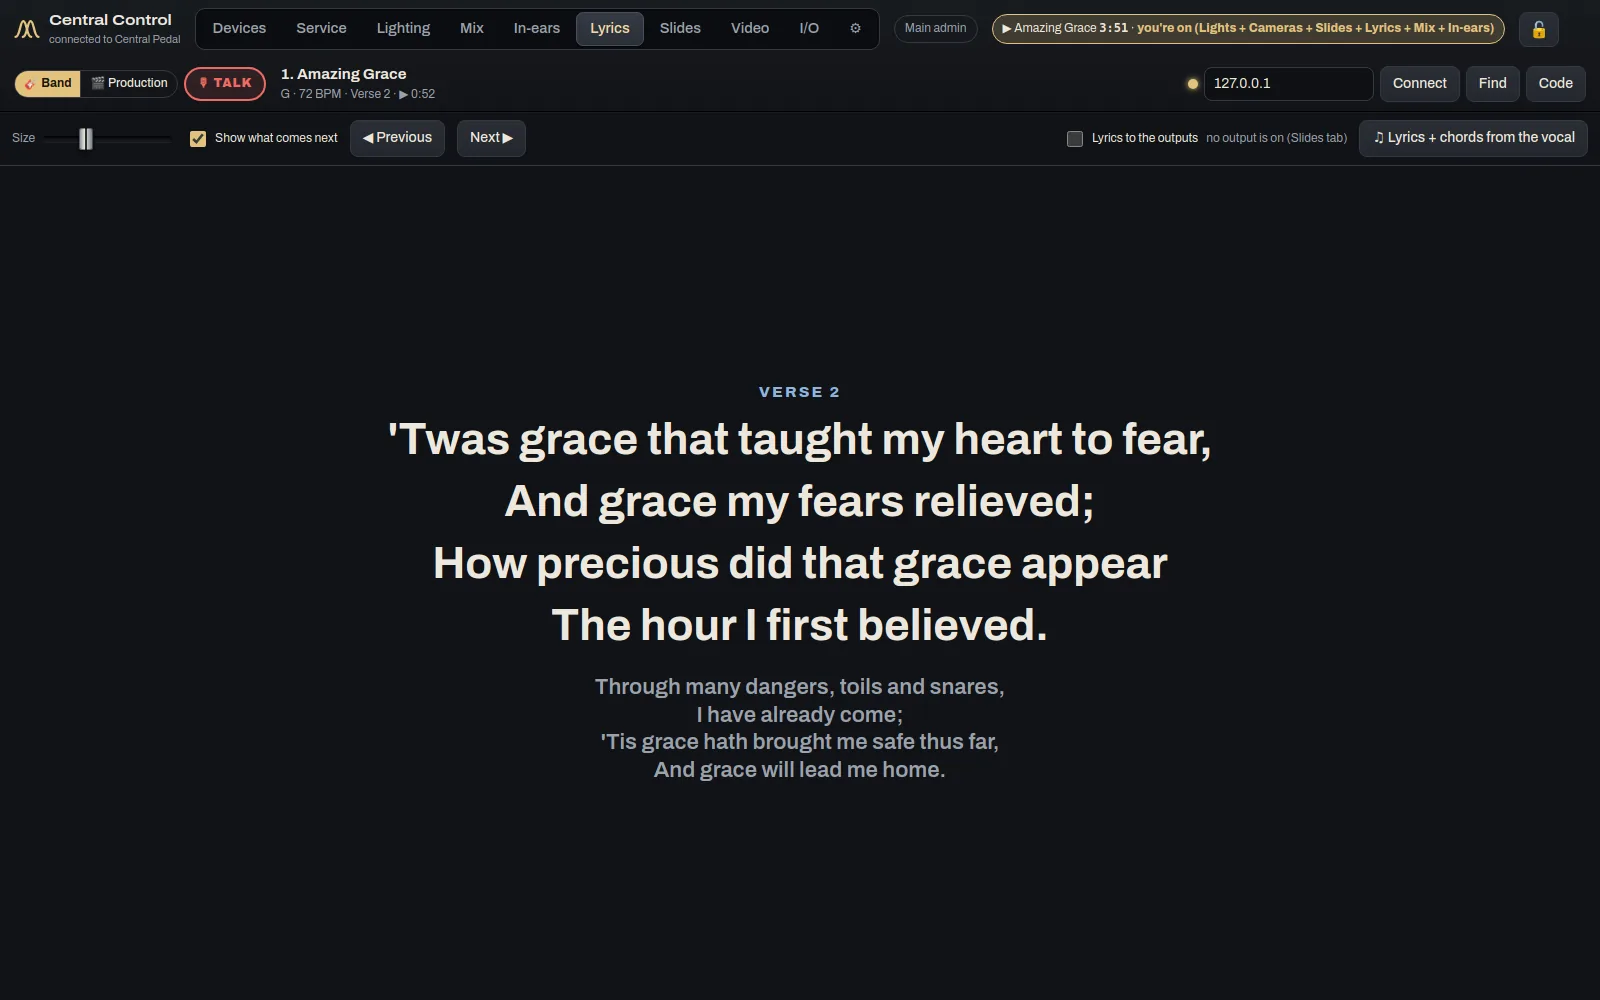
The lyrics follow the Central Pedal. You set the size, colour, alignment and a picture or video background. While the tracks play, paging stays inside the section that's playing.
♫ Lyrics + chords from the vocal listens to the song's vocal track and writes a lyric chart with each chord over the word it lands on. It runs on this computer with a speech model that works offline. Choose Accurate (about 500 MB) or Fast (about 140 MB) under Settings → Lyrics from the vocal. It downloads once.
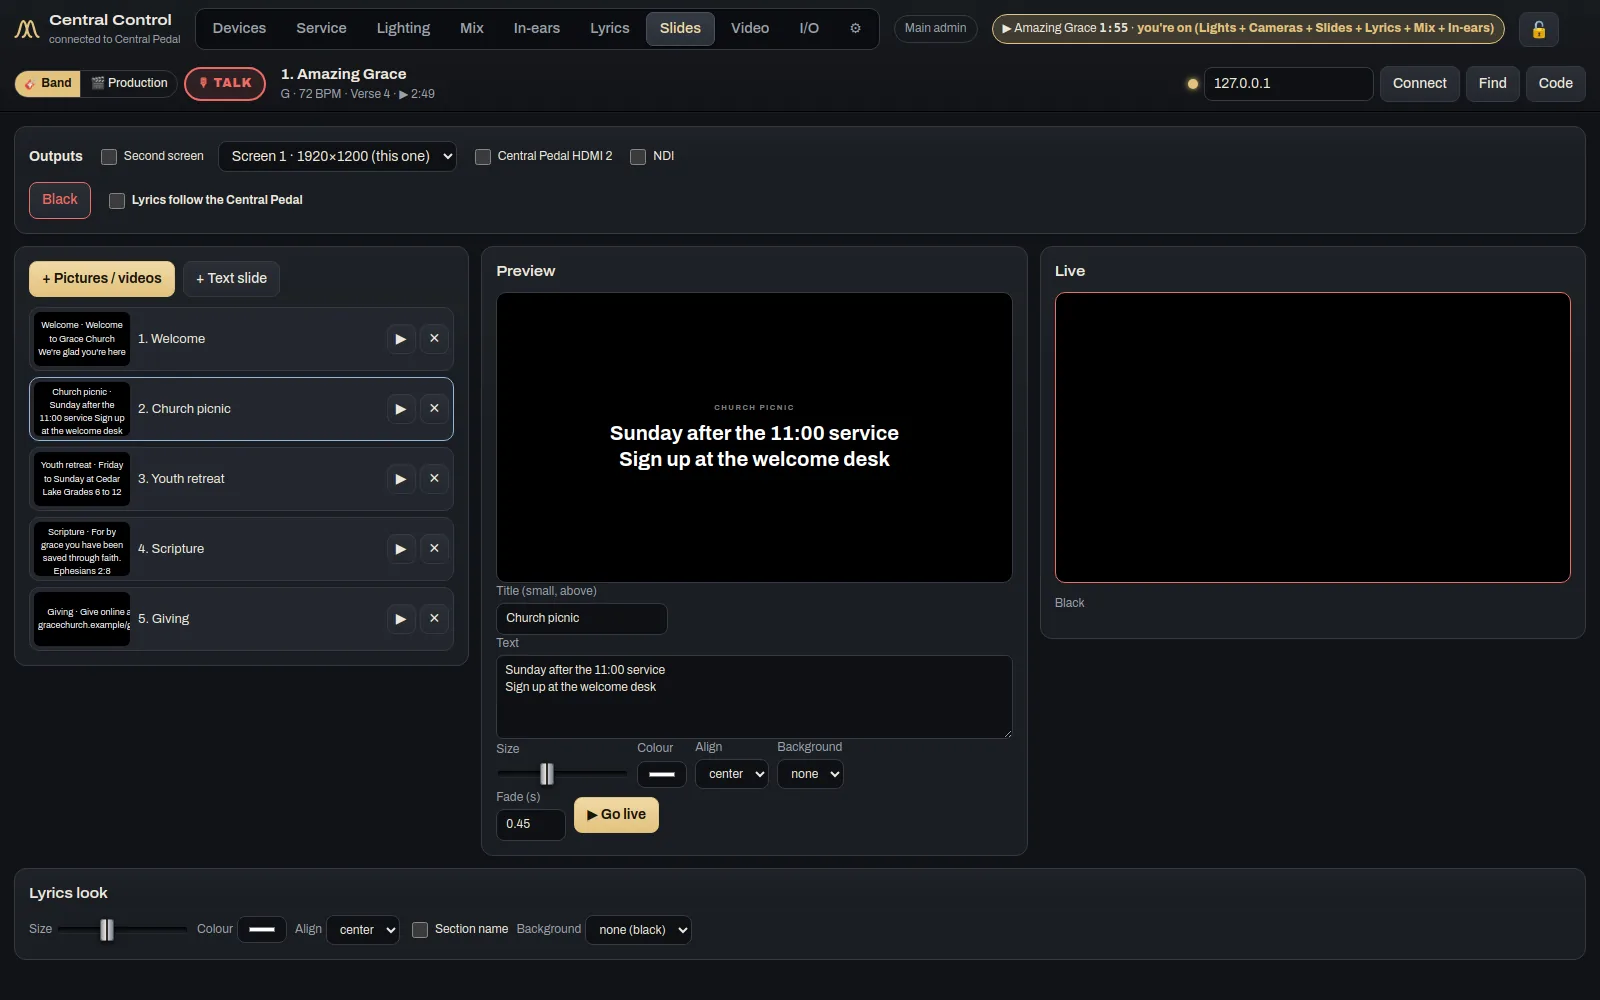
On the Slides tab, add pictures, videos and text slides. Click one to preview it, and double-click it or press Go live to show it. Slides can go to this computer's second screen, to the Central Pedal's HDMI 2 (set it to Slides on the pedal) and to NDI on your network. NDI needs the free NDI runtime from ndi.video.
Video
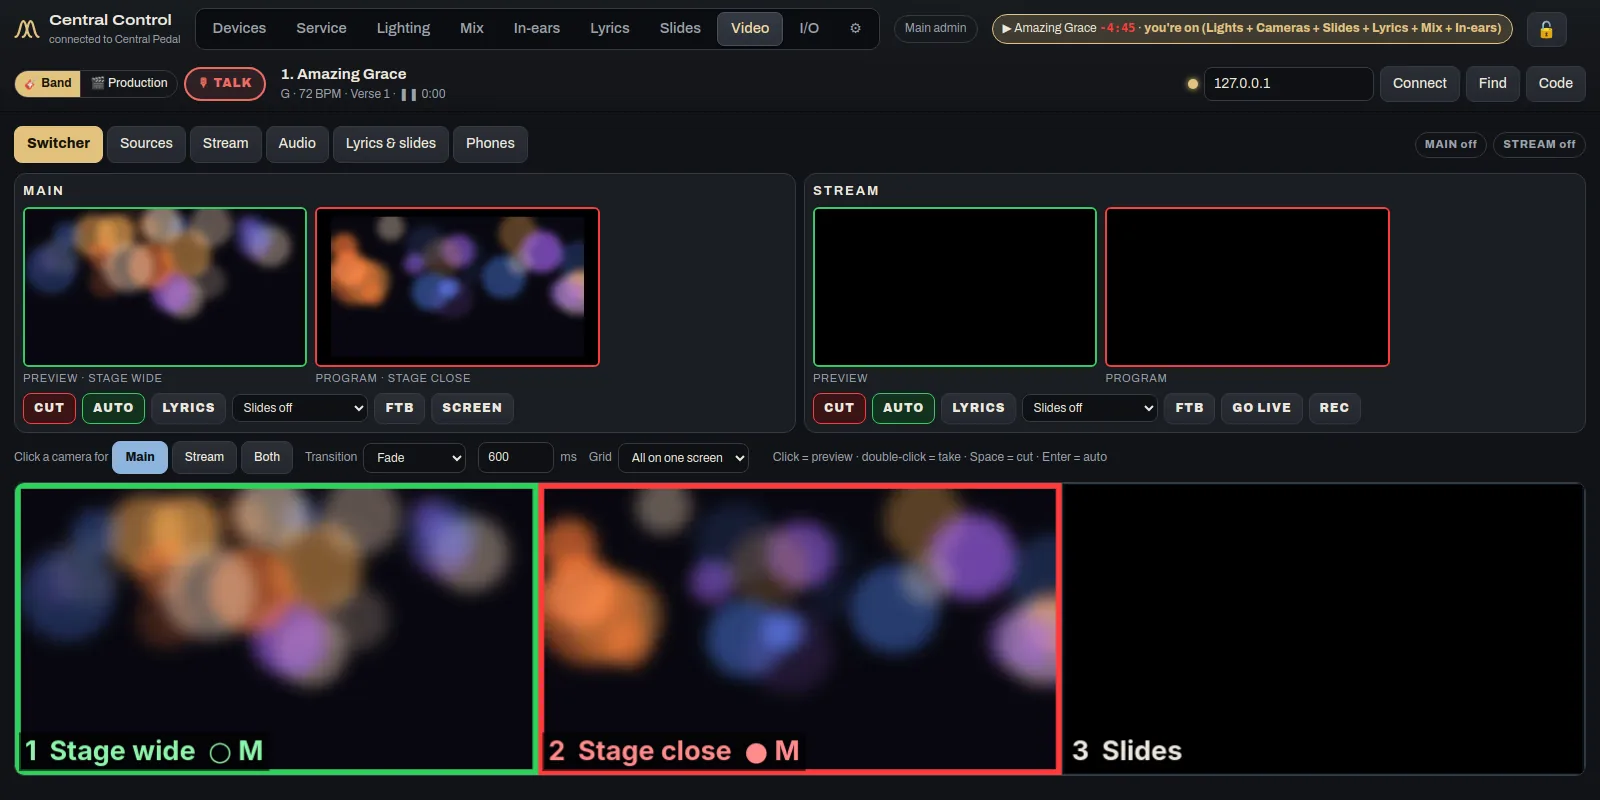
The Video tab is for the main admin and admins with the Cameras job. It takes up to 48 cameras over NDI, USB and HDMI capture, SRT, RTMP and RTSP, and phones. There are two outputs, Main (full screen) and Stream, each with Cut and Auto. You can add a lyrics lower third and the slides, stream to several places at once, send NDI out to OBS or vMix, record, and take two stream audio sources from the interface or Dante.
I/O and Settings
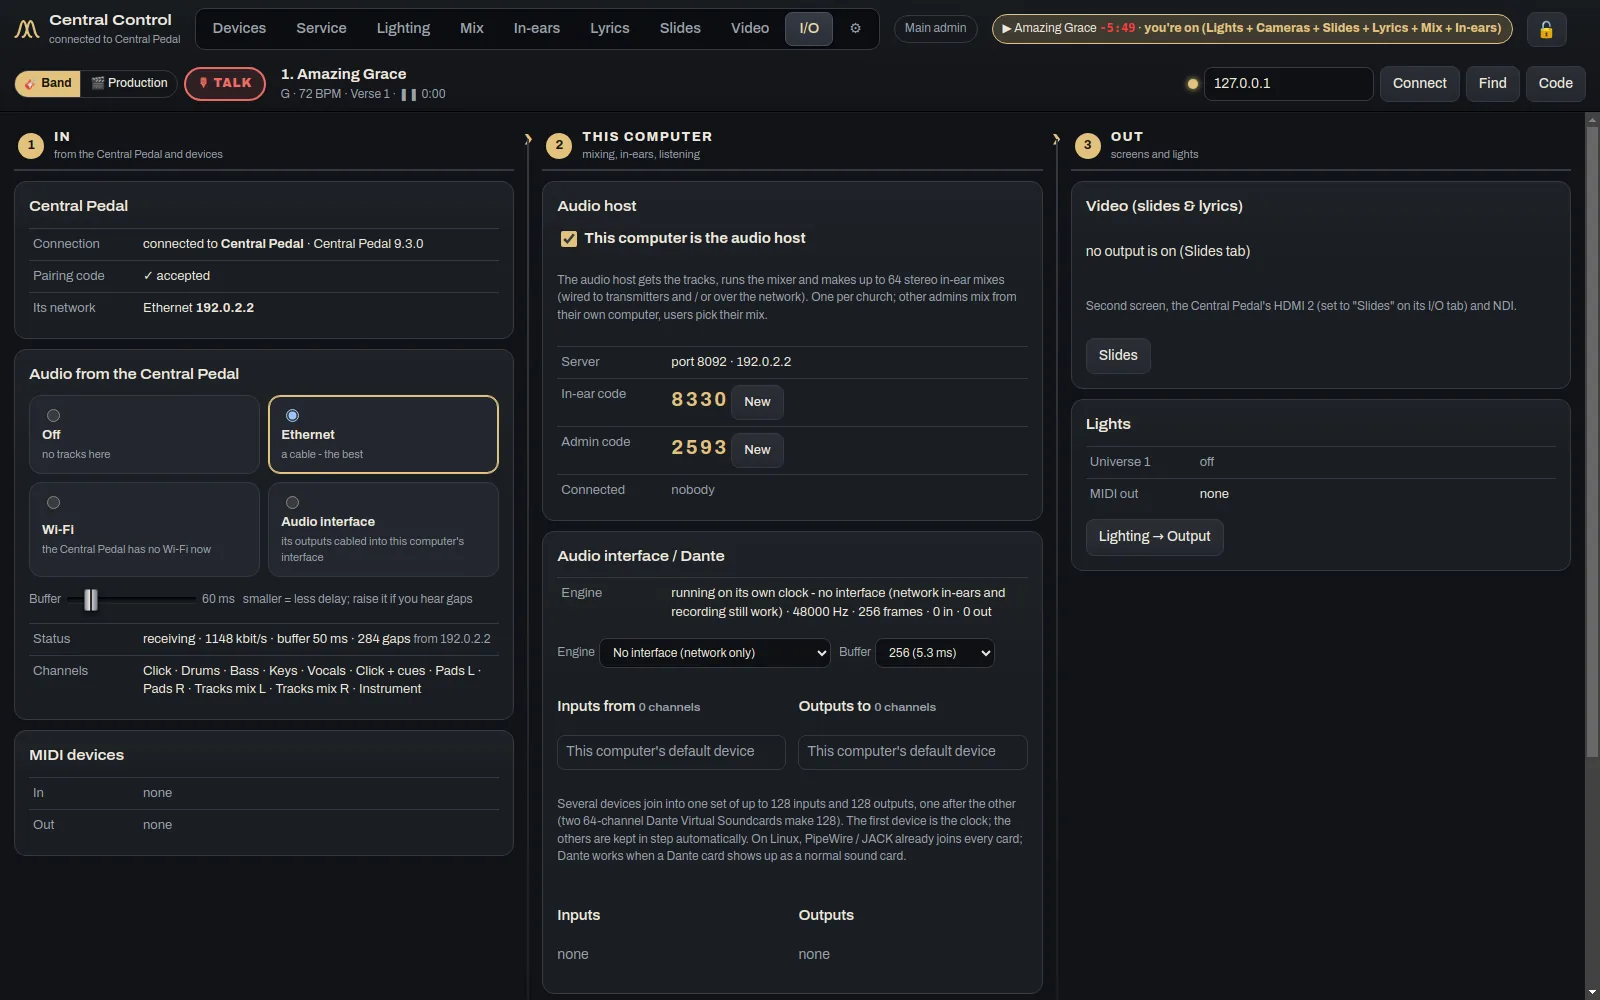
I/O is laid out the way the signal flows. 1 In is the Central Pedal, its audio and MIDI. 2 This computer is the audio host, the interface or Dante, and listening. 3 Out is screens and lights. Under Audio from the Central Pedal, pick the same connection the pedal uses. Ethernet is best. Wi-Fi adds a little delay, so set the buffer. An audio interface cabled in works too.
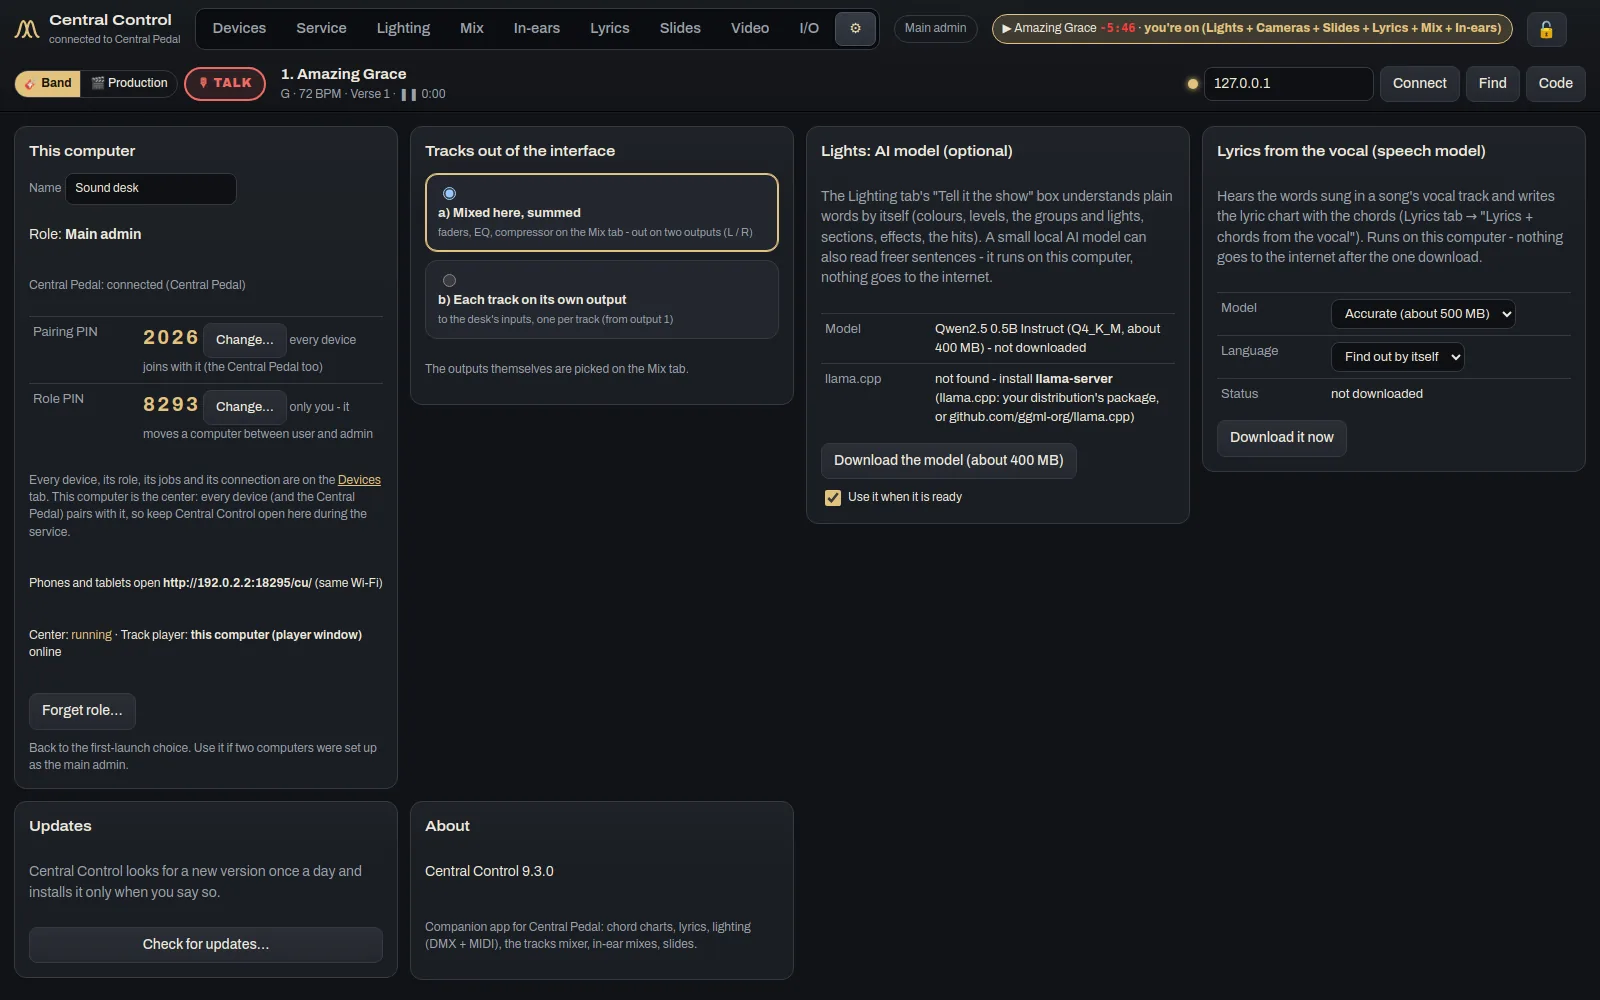
Settings has the same groups in every app, with a search box at the top. Sound, Screens & displays, Look and Controls come first. This computer & devices has the computer's name, role and jobs, and on the main admin's computer the pairing PIN, the role PIN and the hub's address. After that come Planning Center & CCLI, Lights (including the lights helper, which comes with the app), Social media, Packages & key, Software updates and About. Forget role… takes a computer back to its first question.
The second main admin's computer
A church can have two main admins. The second one's computer can keep a full copy of the hub and take over when it needs to, whether that's planned or something goes wrong on a Sunday.
- On the hub, open Devices. Under Second main admin's computer, press Keep … in sync next to it. That computer needs to be an admin running Central Control, and switched on.
- Wait for the first copy. It copies the songs and tracks, the lights and cues, the slides, the mixer, the cameras, the paired devices and the PINs. After that it only copies what's changed, every minute, and the Devices tab shows when it last did.
- To take over, open Settings on the computer that's in sync, press Take over as the hub and type the main admin's role PIN.
If the hub is on, it makes one last copy and hands over. The old hub becomes an admin computer and keeps itself in sync with the new one, so you can swap back whenever you like.
If the hub is off or broken, you'll be asked to confirm, and it uses the last copy. When the old computer comes back, it sees the new hub and steps down by itself.
Phones, tablets, computers and Central Pedals all stay paired and find the new hub by themselves. Each person's own preferences, screens and microphone stay on their own computer.
Common tasks
Pair a new device
On the new device, choose its role and type the pairing PIN (it's under Settings → This computer & devices on the main admin's computer). A Central Pedal asks for the same PIN on its own screen. Then set its role or jobs on the Devices tab.
Change the pairing PIN
Change it under Settings → This computer & devices on the main admin's computer. Devices that are online switch over by themselves, and the rest ask for the new PIN next time.
Lock everything for the service
Press Devices → Service lock, and press it again when the service is over. Anyone can also lock their own computer with 🔓 so nothing they've set gets changed. Hold 🔒 for two seconds to unlock it.
Record the service for the podcast
On the audio host, press Record the service on the Online mix tab, or tick Record it on the run sheet. When you stop, the stereo program becomes Program.mp3.
Troubleshooting
- It says "The main admin's computer was not found on this network." Check that Central Control is open on the hub and that both computers are on the same network. If your network blocks this, type the hub's address under Settings → This computer & devices.
- It says "The center on this computer did not start." Another program is using port 8095. Close it or restart the computer, then open Central Control again.
- Two computers are both set up as main admin. On the one that shouldn't be, go to Settings → This computer & devices, press Forget role… and set it up as an admin.
- There's no sound from the pedal in the mixer. The pedal and this computer need to use the same connection (Ethernet, Wi-Fi or audio interface), and this computer needs to be the audio host on the I/O tab.
- On Linux, the app won't open from the menu after an update. Run the install line again (see Linux). It cleans up old menu entries and desktop icons as it goes.
- Two computers both think they run the lights. Only the one shown under Settings → This computer & devices sends to the lights. The other one shows a Run them here button.
- Still stuck? Write to us through Contact support. Tell us what you pressed and what it said, and a person on our team will write back.