
What it's for
Central Pedal Control is the pedal's app on your computer, tablet or phone. You use it to make the setlist, bring in songs and tracks, and set up the pads, footswitches, knobs and instrument at home or in the office, where it's quieter than the stage.
It's the same app the pedal runs, with the same tabs, so what you see here is what you'll see on stage. You can rehearse on its LIVE screen too.
At church there are two ways to use it with the pedal. You can leave it running on a computer, so it keeps the songs and plays the tracks while the pedal acts as its foot controller. The Pi then has less to store and less to do, and if the computer drops off, the pedal takes over within about 5 seconds. Or you can press ⇪ Upload to send one setlist to the pedal and let the pedal play it on its own.
Your key and your devices
It needs a P key, which gets every update. A P key works on two devices signed in with the same account. Every pack comes with one, or you can buy it on its own for $50.
| Device | What works |
|---|---|
| Mac (Apple Silicon or Intel), Windows, Linux | Everything, including the stem splitter and MP3 practice mixes. |
| Android phones and tablets | Songs, pads, controls, Upload, Download, Central Tracks and your own files. The stem splitter, MP3 practice mixes and importing from a USB stick need a computer or the pedal. |
| iPad (and iPhone) | On the same Wi-Fi as the pedal, open http://padpedal.local:8080/control/ in Safari (or the pedal's address followed by :8080/control/), then press Share → Add to Home Screen. It opens full screen like an app, with ● Live, Upload and Download. An App Store version is on the way. |
Install the apps has the steps for each one.
Upload and Download
- At home, get the setlist ready with its songs and tracks, the pads, the footswitches and knobs, and the instrument.
- At church, join the same Wi-Fi as the pedal, or plug in a network cable.
- Press ⇪ Upload at the top right (or File → Upload…, or Ctrl/⌘+U). Type the pedal's name or address, for example
padpedal.local, and its pairing PIN. Before it sends anything, it shows you what will go, how big it is, what's already on the pedal and whether it fits. - Tick what you want to send. Songs, pads, controls, the instrument and your colours are all there. Only tick outputs and screens if your computer's outputs match the pedal's.
- Press send. The pedal doesn't change anything until everything has arrived. It switches to the new setlist once nothing is playing, or straight away if you press Switch now on the pedal, and only then removes the old one.
If Upload stops halfway, press it again and it carries on from where it got to.
⇩ Download (Ctrl/⌘+D) goes the other way and brings the pedal's songs and setup to your computer.
● Live on the pedal
Press ● Live at the top right, type the pedal's name or address and its pairing PIN, then press Go live. Now you're working the pedal itself over the network. Every tap and fader changes the pedal straight away, with no Upload. You get the same tabs as the pedal's 3.5" screen: pads, tracks, the instrument, the looper and settings. A network cable or 5 GHz Wi-Fi keeps it quickest. Press Close to go back to editing.
LIVE
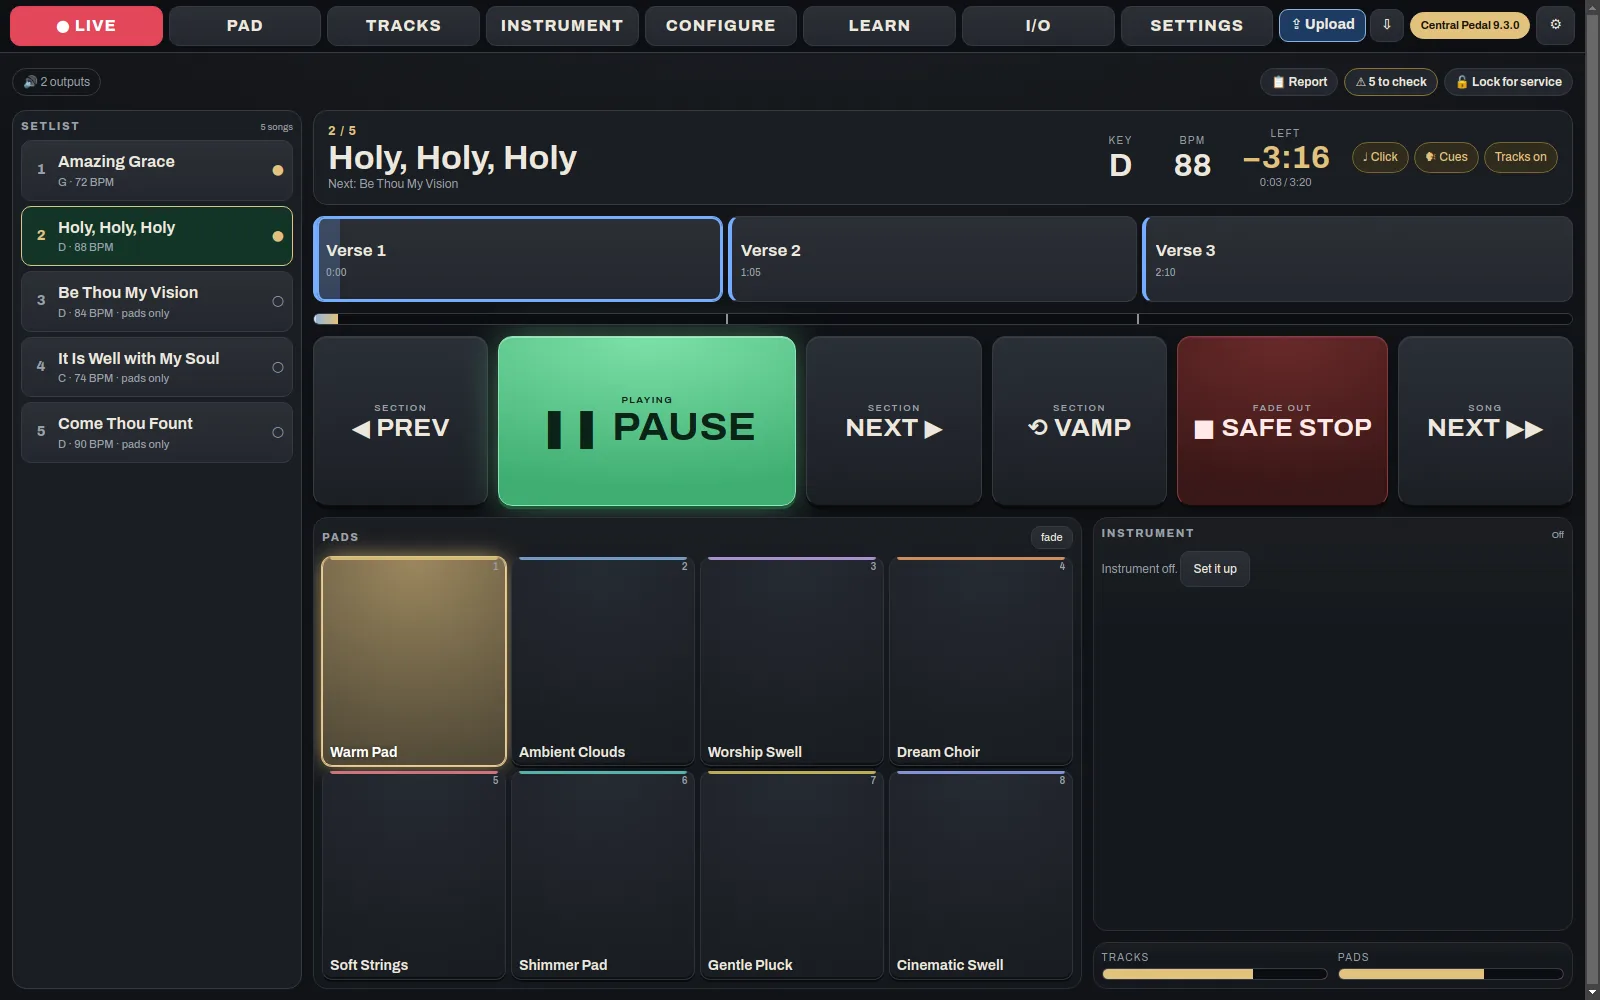
LIVE is the screen for the service, with the setlist, the song's sections in colour, the transport with Vamp and Safe Stop, the pads and the instrument. It works the same way as on the pedal, and LIVE on the Central Pedal explains it.
Pad
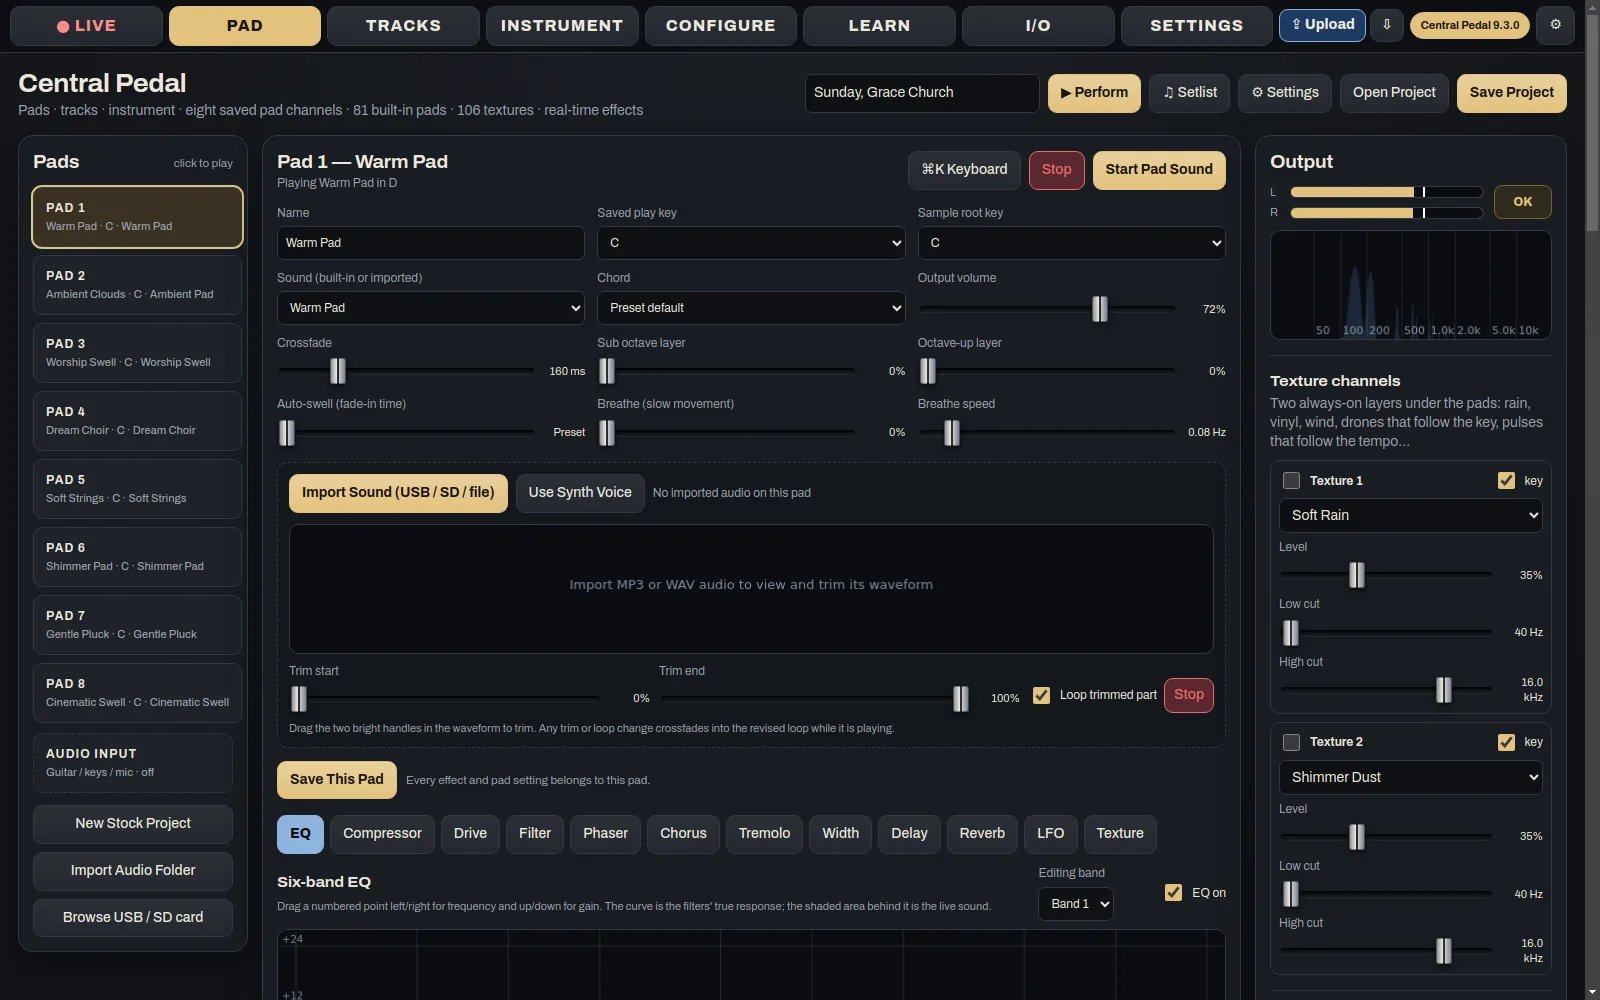
Each song has eight pads. Tap one to crossfade to it and tap it again to fade it out. Along the top you've got STOP, the key, tap tempo, LAYER (up to four pads at once), morph and FREEZE. Each pad has its own volume slider, and moving it never starts the pad.
The built-in pads play in any key. If you import your own (MP3, WAV, FLAC, OGG, M4A or AIFF), the app works out its key and shifts it to the song's key. If it guessed wrong, set the root key yourself.
There are two texture channels with over a hundred presets, things like rain, vinyl, choir air and shimmer beds, and each has its own level.
Every pad has an effects chain with EQ, a compressor, drive, filter, phaser, chorus, tremolo, width, a delay in time with the song, and reverb with shimmer. Tracks get a gate, EQ, compressor, reverb and delay. The basic versions are free and Central Plugins adds the bigger ones.
Scenes live in the song editor. A scene saves the pads, the track mix and the instrument, and brings them back on a section, a button or a MIDI cue, with a smooth, swell or cut change.
Tracks
Adding songs
Press + Song and pick where it's coming from.
- My own (MP3 / WAV) takes one mixed file or a set of stems. Your own files stay on your devices and are never shared.
- Multitrack takes a MultiTracks.com download or any zip or folder of stems. It recognises stems by their names and gets the sections from the Ableton Live set or MIDI file in the download. Tick Combine stems of the same kind if you'd like, say, three drum stems to become one Drums track. Several songs… brings in a whole folder at once.
- Prime track takes a Loop Community song's WAV stems.
- Central Tracks is our own library, including hymns we've arranged with their charts and lyrics. With Central Tracks Unlimited you press Add. Without it you buy the song on the website first.
Planning Center plans come in too. Connect once with a Personal Access Token, pick a plan, and its songs arrive with their key, tempo, arrangement, chart, lyrics and audio.
After an import, the app works out the tempo and key (with its next best guesses a tap away), the beat grid, the sections and the big hits. If the song has no click or spoken guide, it makes them from the grid.
Playing a song
You can change the key and tempo on the fly and the stems stay locked together. Tempo and time signature changes partway through a song are set in the song editor.
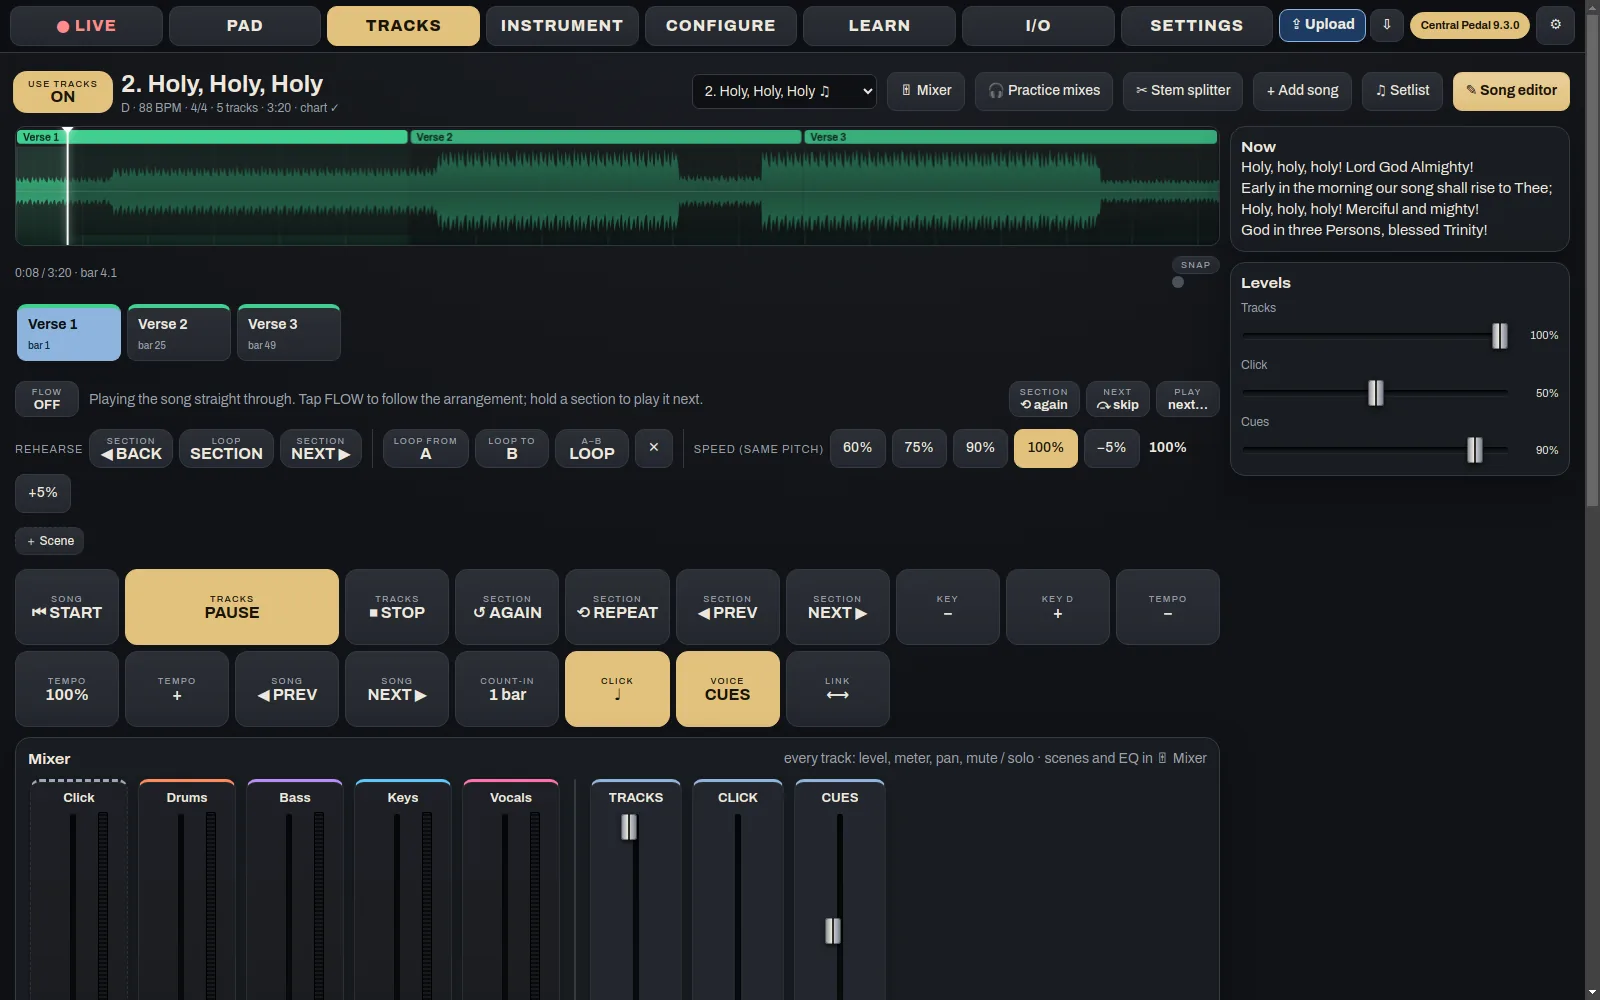
Use Flow to put the sections in the order you'll play them, for example Intro, V1, C, C, Bridge, C. When you're playing, hold a section button to go there next, press ⟲ again to repeat a section, or ⤼ skip to drop the next one.
The mixer has a strip for each track with a fader, meter, mute, solo and pan, and there are master faders for the tracks, the click and the cues. At the end of a song it can stop, get the next song ready, play the next one after a gap, or go straight into it with or without a crossfade.
The click and spoken cues ("Chorus", "Bridge", "1 2 3 4") go to output 3 for the band. You can record the cue words in your own voice in the song editor.
For charts, upload a PDF or text chart, or press Listen & write chord chart. Sheet music… writes out what one stem plays as notation, tab, a piano roll or Nashville numbers, and Parts for every instrument makes a part for each player.
MIDI out sends hits for the lights on accents and sections, the drum hits of split songs, program changes and clock. The same hits go over Wi-Fi to Central Control.
The stem splitter
Tracks → ✂ Stem splitter takes one WAV of a whole song and splits it into the tracks a band plays with, such as lead vocal, backing vocals, drums, bass, guitars and keys, plus a click and a guide. The first time, press Install. It downloads about 2.5 GB once into the app's own folder, and Remove it takes it all away again. It runs on your computer, and an Apple Silicon Mac or an NVIDIA graphics card makes it a lot faster. Listen to the tracks before you add them. You can solo, rename, merge or split any of them again.
Practice mixes
Tracks → 🎧 Practice mixes makes a mix for each musician, with their part turned up, on its own or taken out. It can slow the song down without changing the pitch, move it to another key and add a count-in. The mixes are MP3s if ffmpeg is installed (the pedal already has it. On Linux run sudo apt install ffmpeg and on a Mac brew install ffmpeg), and WAVs if it isn't.
Instrument
For electric or acoustic guitar, you set the input, gain and noise gate, then build a pedalboard on screen. Tap a pedal to switch it on or off, open it to get at its knobs, drag pedals to change the order, and press Sync to put a delay in time with the song. There are 13 ready-made boards, like Clean Worship, Ambient Swell and Edge Dotted-Eighth, and you can save your own.
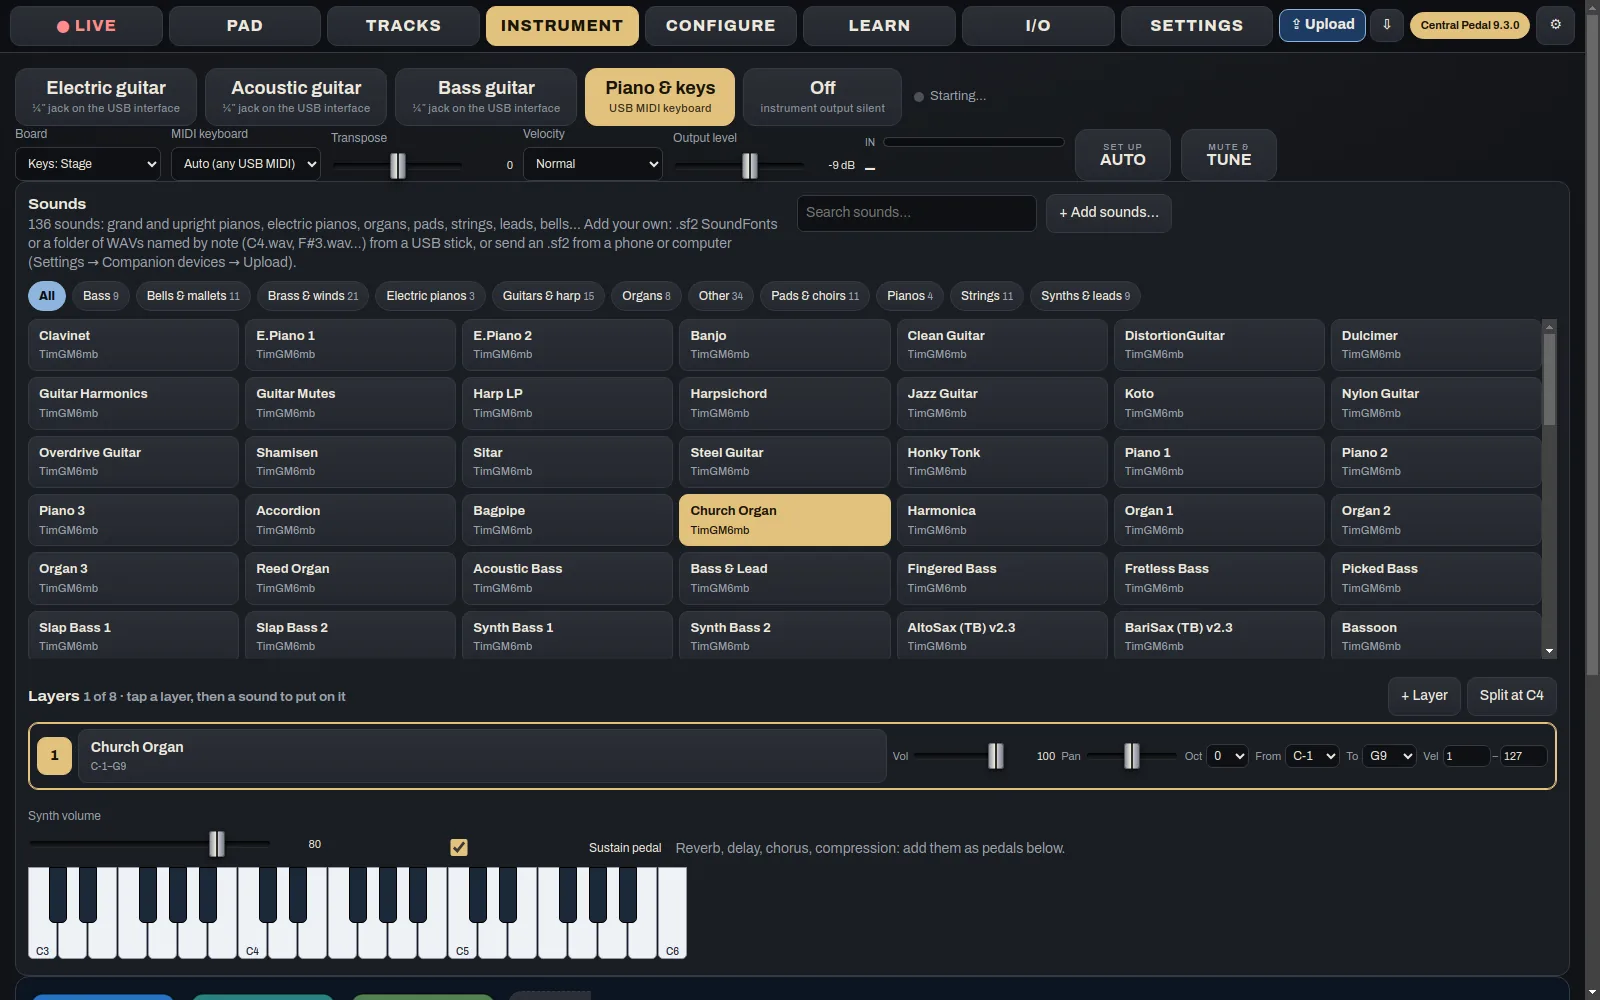
With a USB MIDI keyboard, Piano & keys plays pianos, electric pianos, organs, pads, strings, basses and more, through the same pedals. You can stack up to eight layers, each with its own volume, pan, octave, key range and velocity range. Split at C4 sets up a split in one tap. You can add your own .sf2 SoundFonts or folders of WAV samples too.
On a computer you can use your own plugins: VST3 and CLAP on Windows, Mac and Linux, Audio Units on the Mac and LV2 on Linux. Find them under Add pedal → Your plugins and Piano & keys → Your instruments. Each opens in its own window.
Every pedal has Mix and Level. There's an IR loader for cabinets and acoustic bodies, a tuner, and Auto, which listens to you play and sets the gain, gate and a board for you.
Configure and Learn
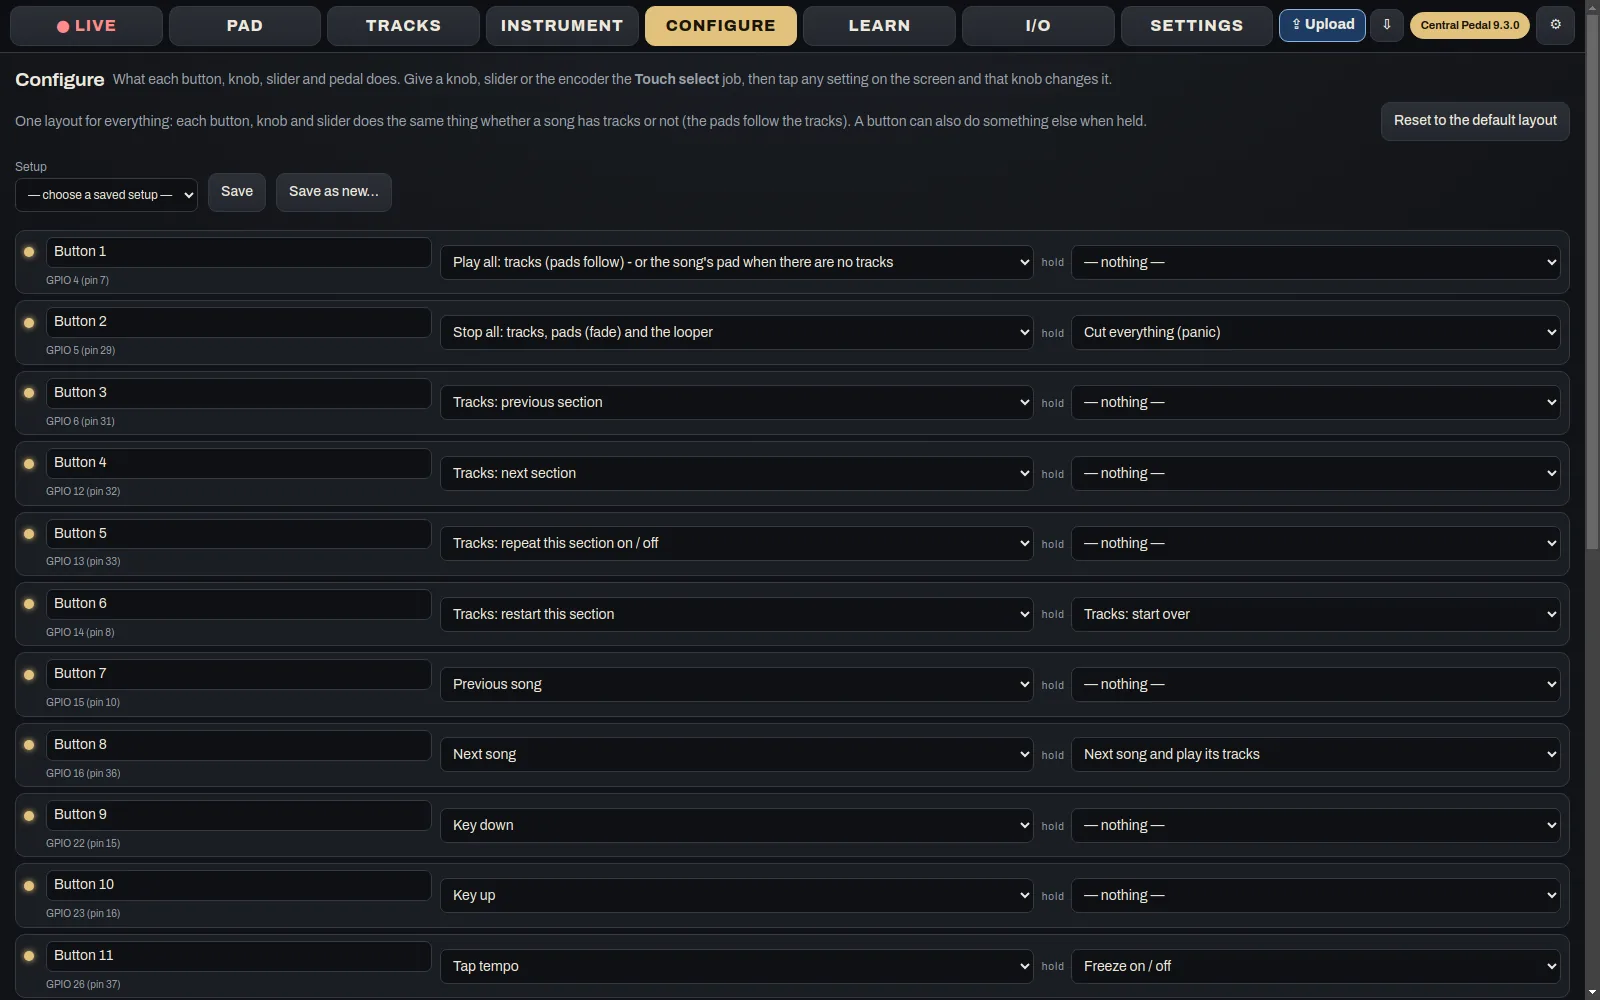
Configure lists the pedal's controls and what each one does in the Pad layout and in the Tracks layout. Buttons get a hold action as well. You pick from a list that covers playing, sections, songs, scenes, pads, the instrument's pedals and boards, the tuner, the looper, the service lock and Ready check. The LEDs follow whatever you set.
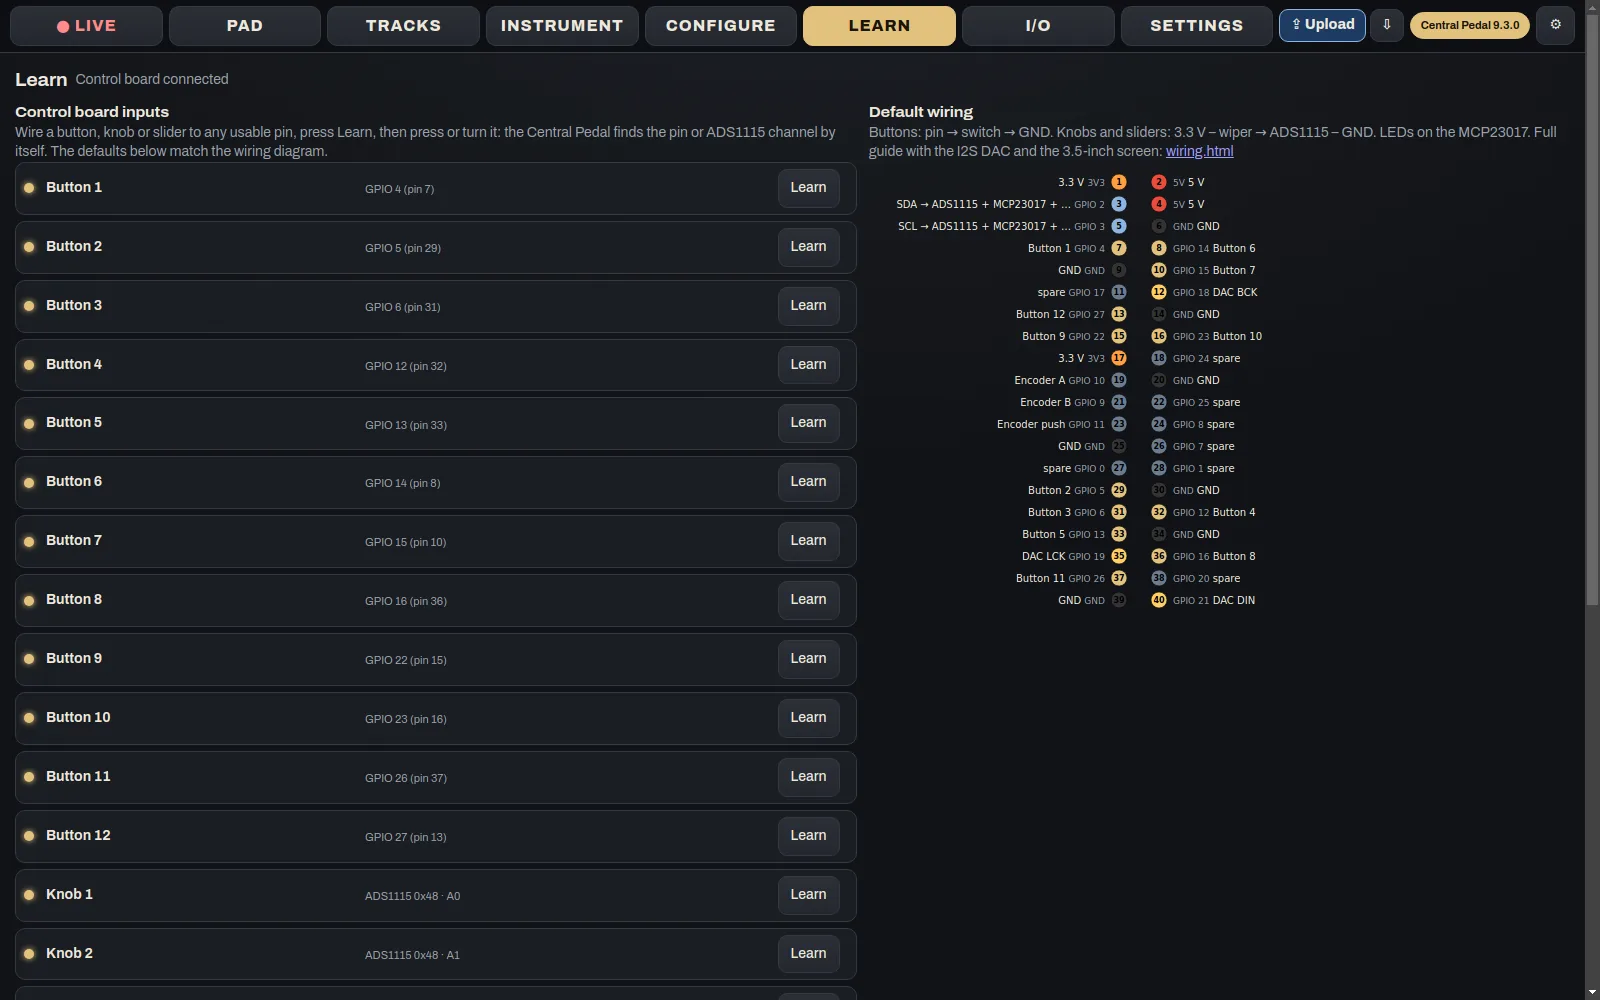
To add a control, go to Learn and press Add new control. Pick Button, Knob or Slider and give it a name. Then press the button once, turn the knob all the way left and then all the way right, or move the slider all the way down and then all the way up. This works with the pedal's own controls, USB foot controllers, MIDI controllers and any key on your computer keyboard. Control board inputs finds the knobs, sliders and buttons on the pedal's board for you, and Reset puts the defaults back.
I/O and Settings
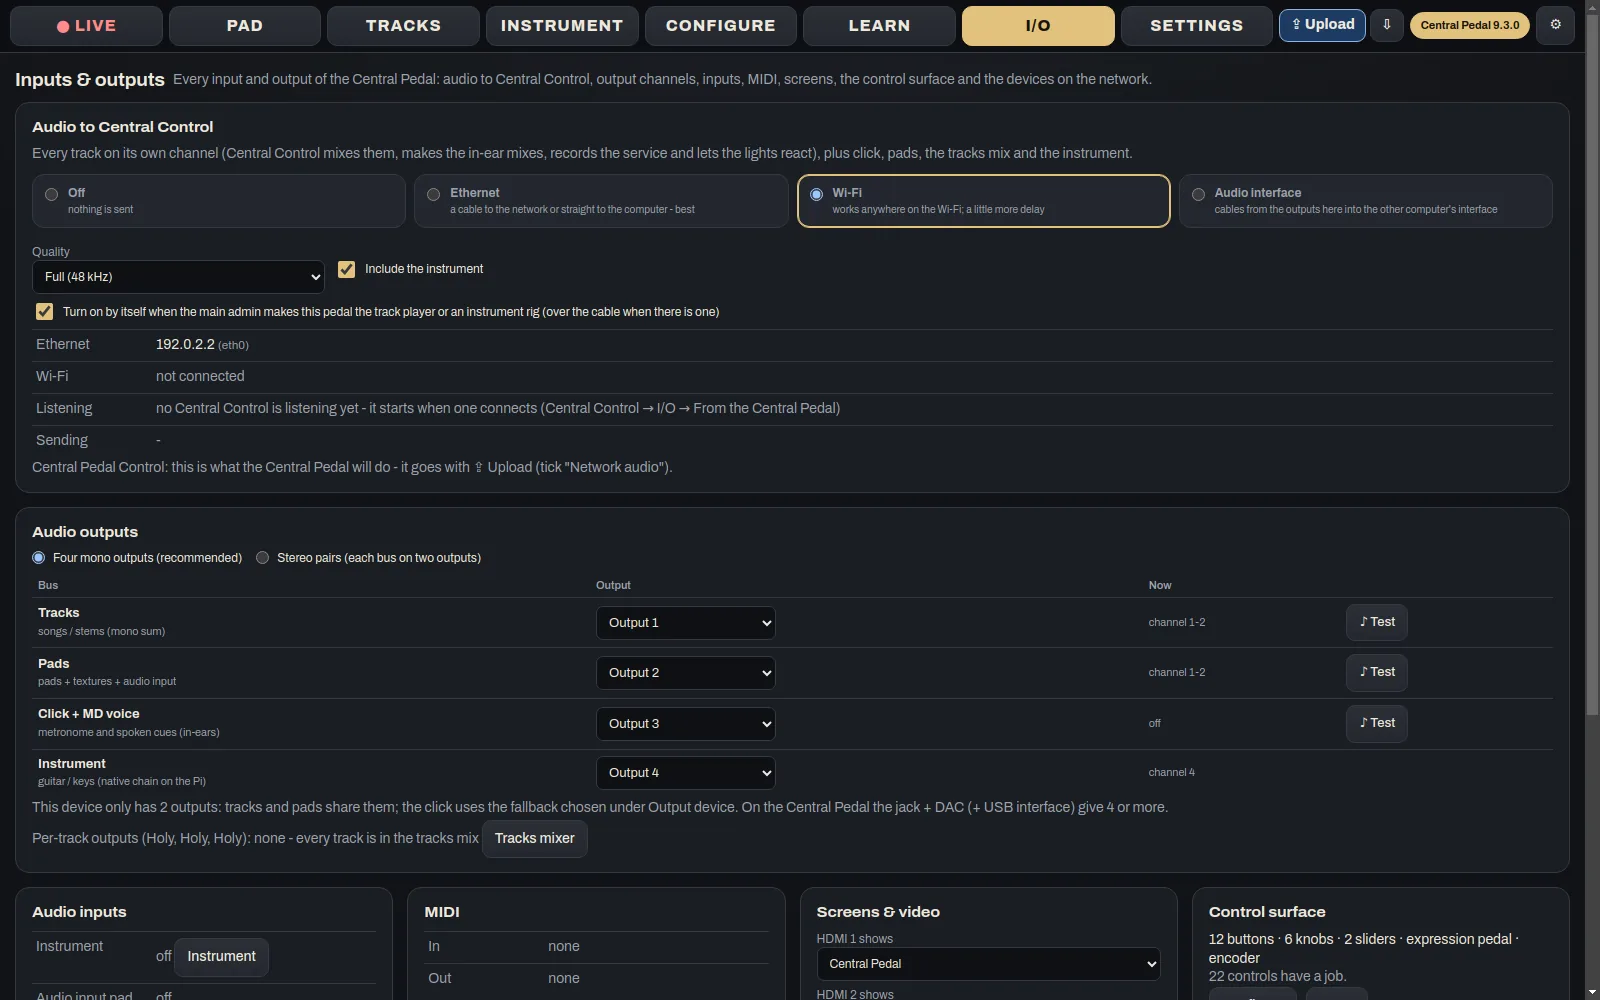
I/O puts every input and output on one page. That includes Audio to Central Control, which sends every track on its own channel over Ethernet, Wi-Fi or an audio interface, along with the outputs, the direct outputs for each track, the inputs, MIDI, screens and the devices on your network.
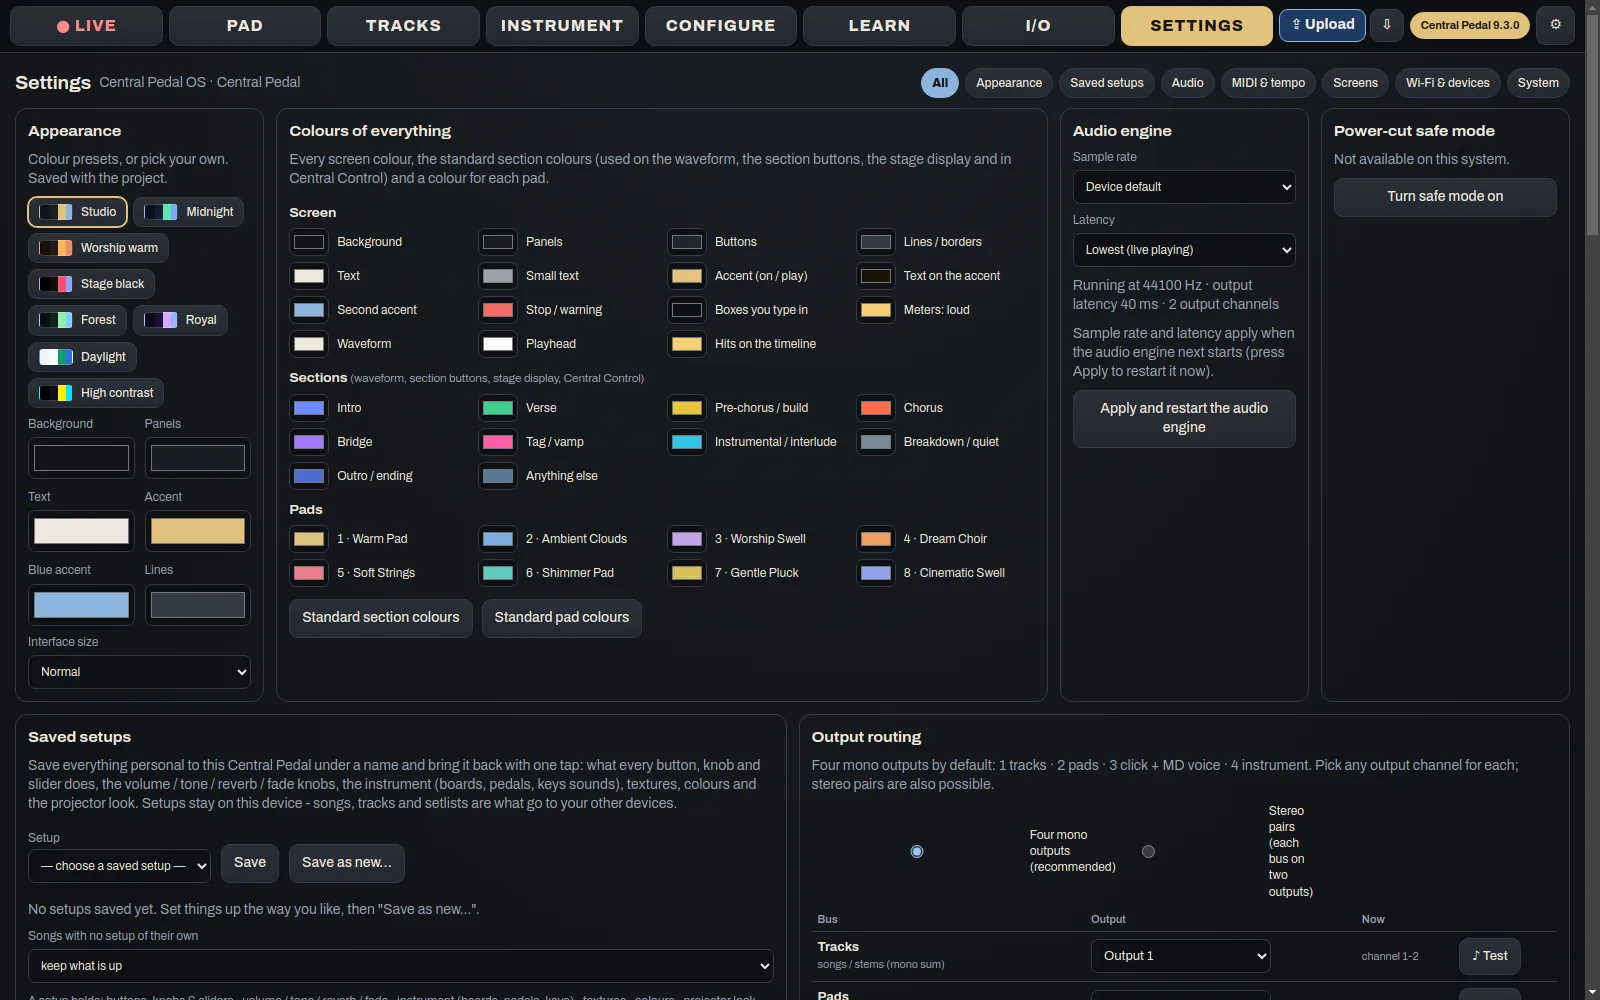
Settings is laid out the same as on the pedal. Sound has the audio engine, the output device and output routing. Look has the colours and the size of everything. Controls has MIDI in, tempo, Ableton Link, MIDI clock and the Stream Deck. You'll also find ProPresenter (so each section can show a slide), the backup player, Packages & key and Software updates & backup.
Looper
The LOOPER tab is a loop pedal with three loops. Each loop can record, overdub, undo, redo, play backwards or at half speed, and has its own level and pan. One footswitch runs it. Tap to record, tap to play and tap again to overdub. Double-tap to stop, and hold it for a second to clear. While tracks or the click are playing, it stays in time with the song. On a computer it records the audio input. The looper on the Central Pedal has more.
Setlists
Open Setlist and you'll see three buttons. Load setlist shows the setlists your church has made before. They're saved on your church's account, so every device sees them. Create new asks for a name and a day, and lets you add the people playing from your Central Services teams. Add songs opens the website on that setlist. Songs you own go straight in, Central Tracks Unlimited covers any song, and anything else you buy first. The app picks up what you added within a few seconds.
Devices you link also share their songs. Open Setlist → Setlists · Song library · Devices… to see them.
- Setlists lists the setlists from all your devices, newest first. Press Open on one, or + New setlist.
- Song library lists the songs with their key, tempo, tracks and the setlists they're in. Delete… asks whether you mean on this device or everywhere.
- Devices is where you link another device. Press Link… and type the other one's pairing code. From then on they copy each other's songs and setlists every few seconds, and the newest change wins. If your network blocks this, use Link by address….
Troubleshooting
- Upload can't find the pedal. Check they're on the same network. Type
padpedal.localor the pedal's IP address, and the pairing PIN from the pedal's Settings. - The pedal didn't change after Upload. Look for the bar along the top of the pedal's screen and press Switch now or Apply now. It waits if something's playing.
- The stem splitter is slow. Studio mode runs several models one after another, so it takes a few times longer than Best. An Apple Silicon Mac or an NVIDIA card helps a lot.
- The pedal is playing the tracks instead of this computer. Check that the computer and the pedal are on the same network and paired. The pedal hands the tracks back as soon as nothing is playing.
- It says "This key is now used on another device." A P key works on two devices. Release one under Settings → Packages & key → Release key, or from My products on the website.
- Still stuck? Write to us through Contact support and tell us what you pressed and what it said.