
What it is
The Central Pedal sits on the floor in front of whoever leads the band. It plays your pads and multitracks, with the click and spoken cues, shows the chart and the lyrics, has a looper, and can be the rig you plug your guitar, bass or keyboard into. You run it with your feet and a small touch screen.
Each one is a Raspberry Pi 4 that we put together, load with the software, test and send out ready to play. Switch it on and it goes straight into the pedal app.
On top there are 12 footswitches, 6 knobs and 2 sliders, a socket for an expression pedal and the 3.5" touch screen. Sound comes out of the Pi's headphone jack (outputs 1 and 2), the DAC board if yours has one (3 and 4), and a USB audio interface if you plug one in. There are two HDMI ports for the app, lyrics, charts or a stage display, and the USB ports take MIDI keyboards, foot controllers, a Stream Deck, an audio interface and USB sticks.
If you've got a computer running Central Pedal Control, it keeps your songs and plays the tracks, and the pedal becomes its foot controller. If you don't, the pedal plays everything itself.
Sounds you add
The pedal doesn't need a key. It's yours, it gets every update, and the starter sounds are free.
The sound plans add pianos, synths, instruments, effects, guitar pedals and pads. Each plan comes as a package key in your email, and it's under My products on your account too. On the pedal, go to Settings → Packages & key → Add a package, paste it in, then install the libraries you want under Libraries.
One package key works on three of your devices at once, as long as each is a different app, for example your pedal, your Central Control computer and your Central Usage tablet. Every plan includes Central Pads, which are pads in every key made for this pedal.
First time on
Your pedal arrives with its card in and the software on it. You set it up from your phone, and it takes a few minutes.
- Plug in the power and your outputs. A screen on HDMI 1 (the micro-HDMI port next to the power socket) is optional.
- On your phone, join the Wi-Fi called Central Pedal Setup. The pedal makes it the first time it starts, and the setup page should open by itself. If it doesn't, go to
http://10.42.0.1. - Pick your church's Wi-Fi and type its password.
- Type a 4-digit code. If your church uses Central Control, use the main admin's code so the pedal pairs with it. If not, any four digits will do. Central Pedal Control uses the same code.
- Press Upload. The pedal joins your Wi-Fi and it's ready. If the password was wrong, "Central Pedal Setup" comes back after about a minute and the page tells you what happened.
Moving to a new building or a new Wi-Fi? Go to Settings → Network & devices → Wi-Fi and press Turn the setup Wi-Fi on to do it again.
Setlists and songs
Open Setlist and you'll see three buttons. Load setlist shows the setlists your church has made before. Tap one to open it. Create new asks for a name and a day, and lets you add the people playing, with your Central Services teams to search. Add songs opens the website on that setlist. On the pedal it shows a QR code for your phone. Songs you already own go straight in, and with Central Tracks Unlimited any song does. Anything else you buy first.
If a computer runs Central Pedal Control or Central Control, it keeps the songs and plays them, and the pedal only holds what it's playing. With no computer, the pedal keeps one setlist at a time. When you open another one, it clears out the old songs, except any that only exist on the pedal.
When the song or the section changes, the lyrics and charts change with it on every screen.
On stage: LIVE
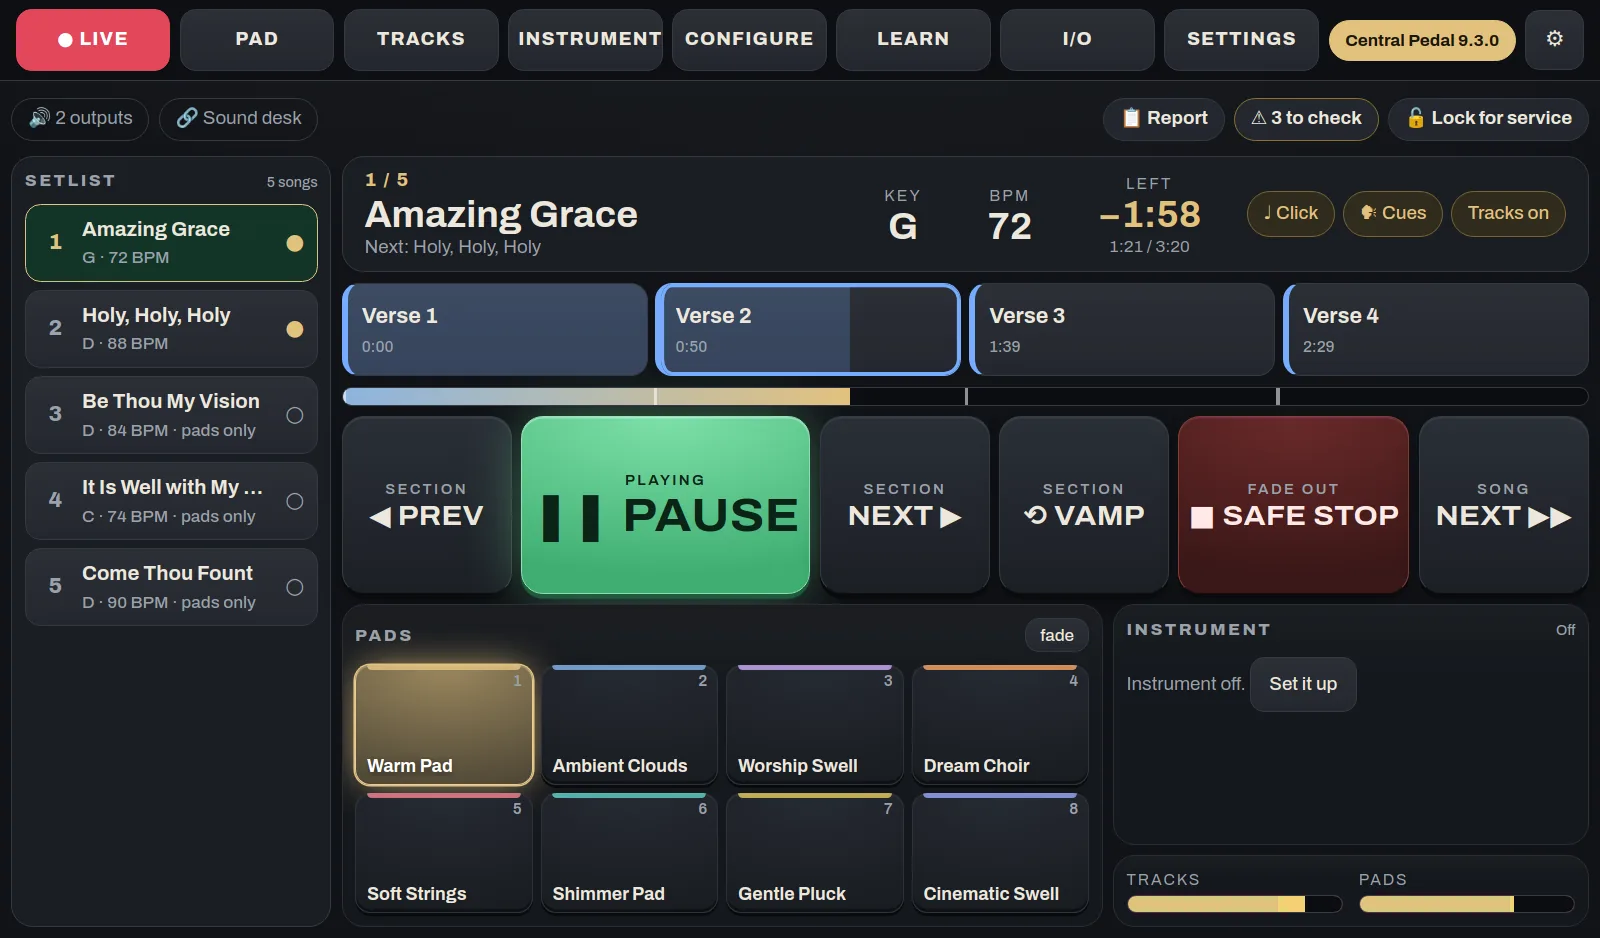
LIVE (F8) is the screen you'll have up during the service.
The setlist runs down the left. A ● means that song has its tracks. Tap a song to load it, or tap it twice if something's already playing. Next to it you'll see the song's number, key, tempo, the time left, what's coming next, and the Click and Cues switches.
The song's sections run across the middle in order, each one sized by how long it is. The section that's playing fills up as it goes, and tapping another one jumps there on the next bar. Under them is the transport: ◀ Prev section, ▶ Play / Pause, Next section ▶, ⟲ Vamp (repeats this section until you press it again), ■ Safe Stop and Next song. Safe Stop fades the tracks and pads out over 2.5 seconds. Press it again to stop straight away.
The pads, the instrument with its tuner, and the meters are at the bottom. Tracks play without pads and pads play without tracks, so use whichever you need.
Before the service
Press Ready check about ten minutes before you start. It looks over the sound, the outputs (and warns you if the click would end up in the room), each song's tracks and sections, the temperature, power, storage and pairing. Most problems come with a button to fix them.
🔒 Lock for service locks the other tabs and anything that changes your setup, so nobody knocks something by accident. Playing, sections, pads, the instrument and the tuner all keep working. Unlock it with the pedal's pairing PIN.
After the service
📋 Report shows how it went: the songs played, any stopped early, safe stops, audio dropouts, the hottest it got, and a minute-by-minute log. ⬇ Download saves it as a text file, which is handy if you need to send it to us.
Pads and effects
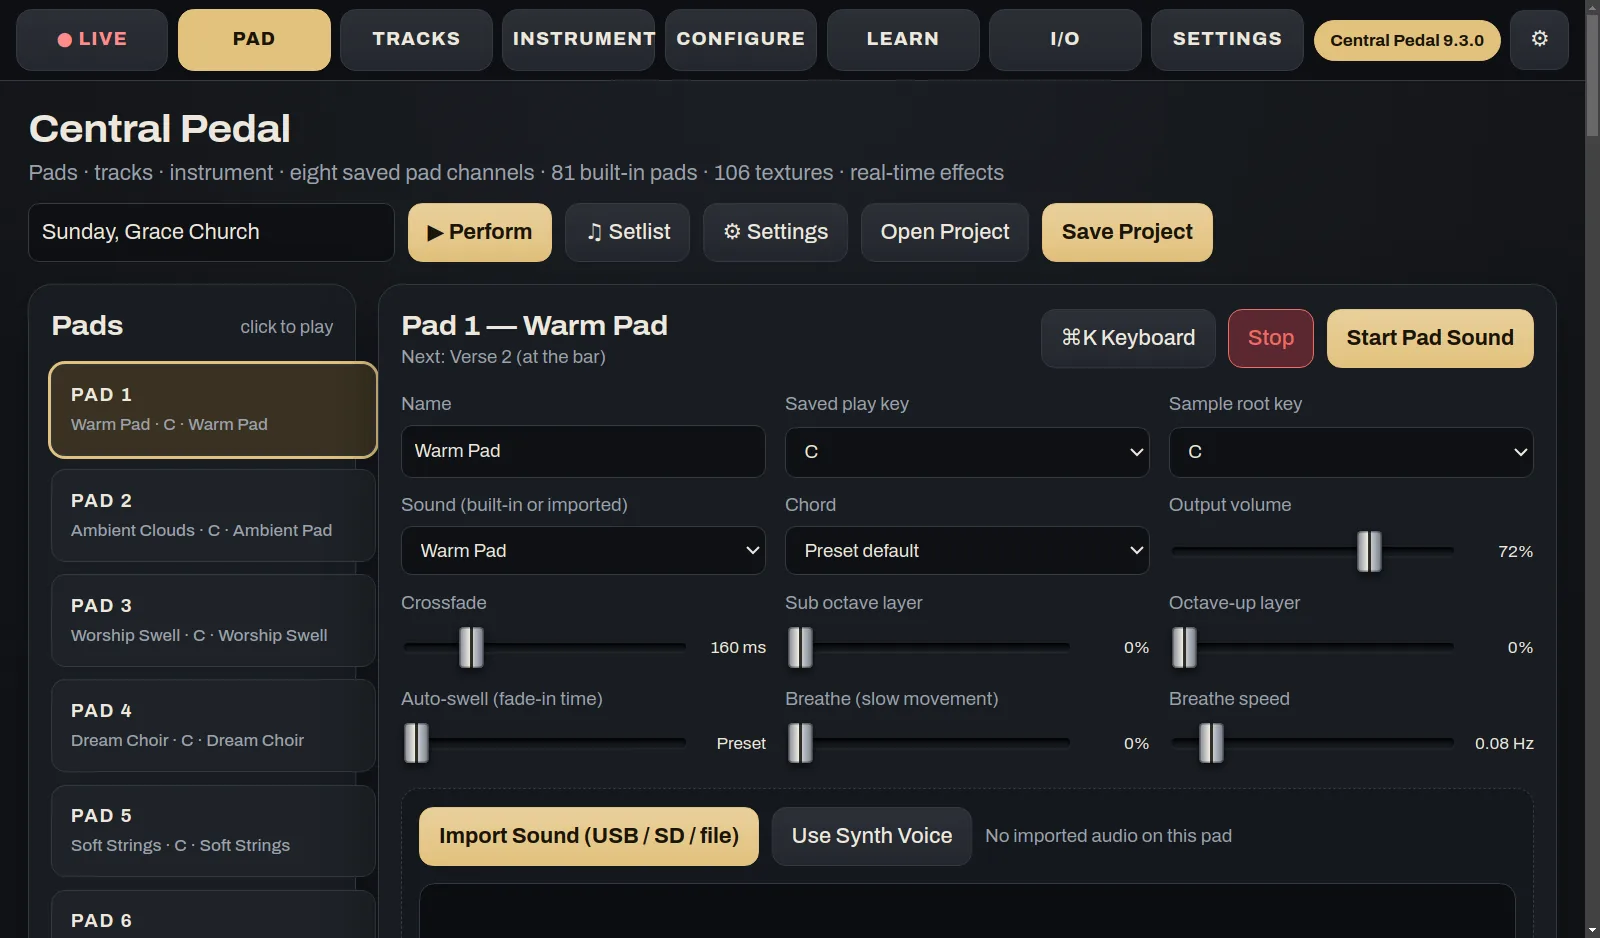
Each song has eight pads. Tap one to crossfade to it and tap it again to fade it out. Each pad has its own volume slider, and moving the slider never starts the pad.
The built-in pads play in any key. If you import your own pad (MP3, WAV, FLAC, OGG, M4A or AIFF), the pedal works out its key and shifts it to the song's key. Below the pads there are two texture channels for things like rain, drones and risers, plus octave layers, auto-swell and freeze. Turn on LAYER if you want up to four pads playing at once.
Effects on tracks and pads
You can put a gate, EQ, compressor, reverb and delay on any track, any pad, and on all the tracks or all the pads together. The basic version of each is free. Central Plugins adds more EQ bands, the full compressor controls, bigger reverbs, delays in time with the song and the pro presets. A track's effects are worked out once and saved, so they don't cost the Pi anything while it plays.
Looper
LOOPER (F9) turns the pedal into a loop pedal with three loops. Each one can record, overdub, undo and redo, play backwards or at half speed, and has its own level and pan. It can record the instrument, the audio input or both.
One footswitch runs it. Tap to record, tap to play, tap again to overdub. Double-tap to stop, and hold it for a second to clear the loop.
If tracks or the click are playing, a loop is a set number of bars and starts on the bar line, so it stays in time. With nothing playing, you tap to start and tap again to close the loop, and the first loop sets the length for the other two. The looper has its own row in Settings → Sound → Output routing, and it never stops your tracks or pads.
Footswitches, knobs and MIDI
Any footswitch, knob or slider can do any job in the app: play a pad, switch tabs, set a level, mute a group, run the looper or switch a pedal on your board. Each one can have a different job in the Pad layout and the Tracks layout, and another one when you hold it down. You set all this on the Configure tab, and the LEDs show what's on, off or in time with the beat.
Adding your own controls
Go to Learn → Add new control, pick Button, Knob or Slider and give it a name. For a button, press it once. For a knob, turn it all the way left and then all the way right. For a slider, push it all the way down and then all the way up. It's saved under that name and you can give it a job on the Configure tab. This works with MIDI foot controllers and footswitches, USB pedals and any key on a computer keyboard.
A MIDI keyboard plays the pads in that key, or the keys sounds on the Instrument tab. CC 64 holds freeze or sustain, and MIDI clock sets the tempo. For a Stream Deck, go to Settings → Controls → Stream Deck, press Connect a Stream Deck, then lay out your own keys and pages.
On a computer keyboard, F1 to F9 switch tabs, 1 to 8 play the pads, Space stops (or plays and pauses on Tracks), [ and ] go to the previous and next song, and the arrow keys move between sections.
You can change the colours too, under Settings → Look. There are a few ready-made looks and a button to go back to ours.
Outputs and sound
| Outputs | Where |
|---|---|
| 1 and 2 | The Pi's 3.5 mm headphone jack (left and right) |
| 3 and 4 | The DAC board, if your pedal has one |
| 5 and up | A USB audio interface, as soon as it's plugged in |
In Settings → Sound → Output routing you decide where the tracks, pads, click, instrument and looper go, on one channel or a stereo pair. Several of them can share an output. There are quick setups for 4 mono outputs, 2 stereo outputs and Everything on 1–2. If something's sent to an output that isn't there, it plays on 1 and 2 instead and Settings tells you.
A USB audio interface works both ways. Its outputs become 5 and up, or you can make it the main output. Its inputs can feed the instrument and the pads' audio input. Choose which ones under Settings → Sound → Audio input.
Settings → Sound → Test sound is where to go when you can't hear something. Press an output's button and the pedal plays a tone on it, listens along the way, and tells you underneath where the sound stopped. It fixes what it can, so press the button again afterwards. Play on each sound card plays a tone straight out of each card, which tells you whether the problem is the cable and headphones.
If the headphone jack crackles and you can't hear the music, set Settings → Sound → Output device → Headphone jack buffer to Biggest.
Screens
HDMI 1 shows the app, a big copy of the 3.5" screen, lyrics or charts. HDMI 2 can show lyrics for the projector, charts, the stage display, slides from Central Control, or nothing. You choose under Settings → Screens & displays.
The stage display shows the song, key and tempo, the section with a countdown of bars, what's next, the lyrics and the beat, big enough to read from across the stage.
Phones and tablets on the same Wi-Fi can open http://padpedal.local:8080, or scan the QR code under Settings → Network & devices, for charts, lyrics, a remote and an upload page. Anyone can look, but changing things needs the pairing PIN. Each musician picks how they read the chart (chords, numbers or sheet music) for their own instrument and clef, with a capo if they want one, and it follows key and tempo changes.
The 3.5" touch screen
The touch screen on the pedal has five tabs along the bottom. You can tap a fader or drag along it. Restart and Shut down ask you to tap twice so you can't hit them by mistake.
| Tab | What's on it |
|---|---|
| Pads | Pads has the eight pads, each with a volume bar, and Stop. Key has all twelve keys. Sound has volume, reverb, tone, fade, freeze, layer and the textures. Effects has the effects on each pad and on all of them. |
| Tracks | Play has the sections and the transport. Mixer has each track's level and mute. Setlist lets you go to a song, start the set, add songs from an A–Z list, change the order, or open another setlist with SETS. Effects has the effects on each track and on all of them. Scenes has this song's scenes, lyrics pages, projector blank and what HDMI 1 and 2 show. Tempo has the tempo, tap, the click and its level, voice cues and count-in. |
| Instrument | Sound picks electric, acoustic, bass, keys or off, or any board or keys sound from the list. Pedals switches each pedal on the board on or off. EQ · Comp has the EQ and compressor knobs as faders. Tuner · Level has the tuner, the levels and Auto set-up. |
| Looper | Loops has the three loops and the main record button. Mix has each loop's level and pan. Setup has the timing, length and count-in. |
| Settings | Audio has the inputs and which output each group goes to. Wi-Fi joins a network with the on-screen keyboard, or starts the phone setup. Controls shows what each button, knob and slider does. Screens sets what HDMI 1 and 2 show. Touch lets you calibrate the screen, test it or flip it. System has the version, updates, adding a package key, restart and shut down. |
If your taps land in the wrong place, go to Settings → Touch → Calibrate on the small screen. Tap the five crosses (the four corners and the middle), tap the dot to check, and press Save. The touch test shows a dot wherever you touch, so you can see how it's doing.
Updates, backups and power cuts
The pedal checks for updates each time it starts and installs a new version after a 10-second notice, never while something's playing. You can also install one yourself from Settings → Software updates & backup. Every download is checked before it goes on, and your songs and settings stay as they are.
If there's no internet at your church, put the newest pedal update from the Downloads page on a USB stick and use Settings → Software updates & backup → Update software from USB….
Back up to USB stick saves your songs and their audio, charts, lyrics, pads, sounds, light shows, setlists and settings. Restore from USB… puts a backup back.
Power-cut safe mode is on from the start. The system runs read-only from memory, so pulling the plug mid-song can't damage it. Your songs and settings are kept on a separate part of the card that saves normally.
Troubleshooting
- It says it's playing but there's no sound. Go to Settings → Sound → Test sound and press 1. The pedal tells you where the sound stopped and fixes what it can. If Play on each sound card is silent too, check the headphones, the cable and whatever they're plugged into.
- Taps on the 3.5" screen are off, or light taps don't register. Calibrate it on the small screen under Settings → Touch → Calibrate.
- The start-up report says "under-voltage", or the pedal feels slow. The power supply isn't strong enough. Use the official Raspberry Pi 5.1 V 3 A supply.
- The text on a monitor looks blurry. Set Settings → Screens & displays → Resolution to Automatic, or the one marked native.
- The edges are cut off on a TV. Turn on the TV's "Just scan", "1:1" or "Screen fit" setting, or use Edges cut off? under Settings → Screens & displays.
- The 3.5" screen stays white. Its driver isn't on yet. From a phone or computer on the same Wi-Fi, open
http://padpedal.local:8080, go to Settings → Screens & displays → Touch screen, pick your screen and restart. Try 3.5" RPi Display – XPT2046 first, then Waveshare 3.5" (A), then (B). A monitor on HDMI works for this too. - No picture on the monitor. HDMI 1 is the micro-HDMI port next to the power socket. A monitor plugged in later is picked up by itself.
- The Wi-Fi won't connect. Settings → Network & devices → Wi-Fi tells you why, whether that's the wrong password or being out of range. Hidden networks are under Other network…. You can also start again from your phone: press Turn the setup Wi-Fi on and join "Central Pedal Setup".
- A package key won't go on. It works on three of your devices, each a different app, so it can't go on two pedals. Release it from the other one (under Settings → Packages & key, or My products on the website). If it says the plan has ended, renew it on the website. If your church gave you the key and has taken it back, ask your main admin.
- Central Pedal Control can't find the pedal. They both need to be on the same network. Type
padpedal.localor the pedal's address, and its pairing PIN. - Still stuck? The pedal writes a start-up report to its card called
central-pedal-log.txt. Put the card in a computer, open the "bootfs" drive and send us that file through Contact support, along with what Test sound said if it's a sound problem.